Difference between revisions of "RQGIS, Utilizing Rstudio as an alternative GIS"
| Line 54: | Line 54: | ||
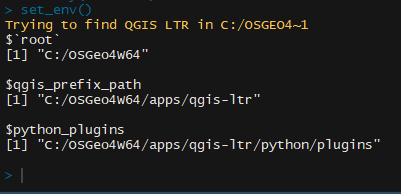
[[File:Setenv.PNG|600px|thumb|none| Figure 1: Connection of QGIS paths within the RStudio Workspace.]] |
[[File:Setenv.PNG|600px|thumb|none| Figure 1: Connection of QGIS paths within the RStudio Workspace.]] |
||
Now you have full access to all of the geoprocessing functions found within your copy of QGIS Desktop. Within this workspace you will be able to call these functions to manipulate and display spatial data. |
Now you have full access to all of the geoprocessing functions found within your copy of QGIS Desktop. Within this workspace you will be able to call these functions to manipulate and display spatial data. |
||
| + | == Data Acquisition == |
||
| + | In this tutorial we will make use of datasets that are accessible within RStudio, to demonstrate the use of various geoprocessing functions. In order to access these datasets you use the data() function which provides the user with a list of all available datasets preloaded within RStudio. Additionally the getData() function allows the user to download geographic data for specific countries around the world. |
||
| + | |||
| + | First up we will create a folder within your main directory in order to store all of the outputs that we create within this tutorial. This folder will be placed in the first branch of your C: drive, if your computer's IOS is located on a different drive (such as a D: drive) you will have to modify the drive name within the code to suit your computer's drive. |
||
| + | #Create a working directory for this tutorial |
||
| + | mainDir <- "C:/" |
||
| + | subDir <- "tutorial" |
||
| + | if (file.exists(subDir)){ |
||
| + | setwd(file.path(mainDir, subDir)) |
||
| + | } else { |
||
| + | dir.create(file.path(mainDir, subDir)) |
||
| + | setwd(file.path(mainDir, subDir)) |
||
| + | } |
||
Revision as of 15:01, 20 December 2018
Contents
Introduction
This tutorial is meant to demonstrate how to utilize RQGIS as a method of processing and analyzing spatial data. You will learn how to set up an environment within R to utilize RStudio as a GIS application. Additionally, you will learn how to make use of various QGIS, SAGA and GRASS functions within RStudio by accessing their functions using the R coding language.
RStudio and RQGIS
RStudio
RStudio is an open source IDE that utilizes the programing language “R”. Due to the nature of open source software a wealth of packages have been developed for the “R” language(RQGIS included) which allow users to preform various types of statistical analysis, modeling and geospatial processes.
RQGIS
RQGIS acts a bridge package between the functionality of QGIS and the IDE of RStudio. By installing this package, the user can access the geospatial processing functions found within QGIS from within RStudio. This allows for the user to utilize R as their primary GIS without losing any of the functionalities tied to using QGIS.
Installation guides
QGIS
We start by creating a fresh install of QGIS in order to download the functions that we will be exploring in this tutorial. QGIS can be installed from https://www.qgis.org/en/site/forusers/download.html, for the purposes of this tutorial we will be installing the 64-bit version.
- After downloading the installer, open it, select Advanced install then click next
- We will be intalling QGIS into the default root directory so click next to continue through the installer
- Next select install from internet and then click next
- A default directory will be created for temporary files, you can create a custom directory for these temporary files or use the default one
- Select direct connection and click next
- Select the host http://download.osgeo.org which will act as the provider for the download
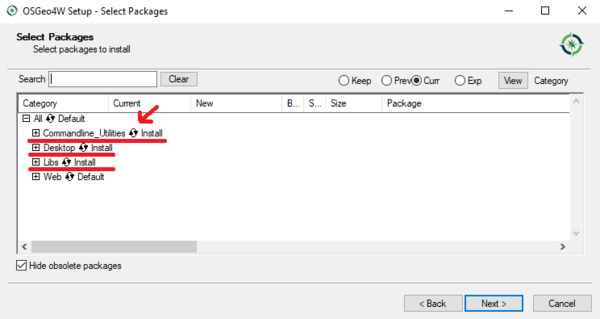
- Next click the circle to select install for: commandline_Utilities, Desktop, and Libs
R and RStudio
In order to utilize RStudio we first need to download R. This can be installed from https://cran.r-project.org/bin/windows/base/. For this installer we will be accepting all of the default paths and options.
Now we can download RStudio, similar to R we will be utilizing all default paths and options. RStudio can be downloaded from https://www.rstudio.com/products/rstudio/download/#download.
RStudio and RQGIS setup
Now that we have all of the software that we need we can proceed with setting up RQGIS within RStudio. Start by opening up RStudio and creating a new ‘’’R script’’’ file (file->new file->R script). Within this new script we will be downloading and installing some packages that allow us to manipulate raster and spatial data within RStudio. Start by adding this code to your script and running it.
#Install packages
install.packages("sp")
install.packages("RQGIS")
install.packages("rgeos")
install.packages("raster")
#Attach packages to workspace
library("sp")
library("RQGIS")
library("rgeos")
library("raster")
- sp: provides functions for plotting spatial data
- RQGIS: Creates a link between the IDE (RStudio) and functions found within QGIS
- rgeos: allows for the manipulation of vector data
- raster: Provides the user to read, write and manipulate raster images within RStudio
Now that we have installed all the necessary packages we have to link the directory of the QGIS applications to our current RStudio workspace. This is achieved by utilizing the set_env() function.
#Links QGIS paths to the current RStudio workspace
set_env()
Try adding this line to your script,after running this line the console should provide path names similar to this example.
Now you have full access to all of the geoprocessing functions found within your copy of QGIS Desktop. Within this workspace you will be able to call these functions to manipulate and display spatial data.
Data Acquisition
In this tutorial we will make use of datasets that are accessible within RStudio, to demonstrate the use of various geoprocessing functions. In order to access these datasets you use the data() function which provides the user with a list of all available datasets preloaded within RStudio. Additionally the getData() function allows the user to download geographic data for specific countries around the world.
First up we will create a folder within your main directory in order to store all of the outputs that we create within this tutorial. This folder will be placed in the first branch of your C: drive, if your computer's IOS is located on a different drive (such as a D: drive) you will have to modify the drive name within the code to suit your computer's drive.
#Create a working directory for this tutorial
mainDir <- "C:/"
subDir <- "tutorial"
if (file.exists(subDir)){
  setwd(file.path(mainDir, subDir))
} else {
  dir.create(file.path(mainDir, subDir))
  setwd(file.path(mainDir, subDir))
}


