Difference between revisions of "Using GPX for the novice geocacher"
m (Protected "Using GPX for the novice geocacher": Excessive vandalism ([edit=autoconfirmed] (indefinite) [move=autoconfirmed] (indefinite))) |
|||
| (20 intermediate revisions by 3 users not shown) | |||
| Line 1: | Line 1: | ||
= Background = |
= Background = |
||
Geocaching is not only a fun hobby, but it is also a way to connect people from all walks of Earth. Going on a road trip? Why not stop at some interesting locations to hunt for geocaches, where dozens of others have also stopped and left notes or other small gimmicks. Geocaching has come a long way since it first began. The dedicated geocaching app has multiple features that can aid in a user's search, however, most of these are paid services. For instance, the ability to view maps and create lists of geocaches is only available in the 'premium' package. In this tutorial, I will walk you through some simple steps and processes so that you can geocache as well, if not better with the 'basic' package (free) than someone who has paid for the 'premium' package (paid). |
|||
The GPX format is the main tool being used for the collection and exchange of the GPS data by geocache users. This is a XML based data format that permits the easy exchange of GPS data between software and web services via the internet. |
|||
This tutorial will cover the following: |
|||
* How to download waypoints from geocache.com |
|||
* How to use various open-source software to create simple maps which can be used to assist the hunt |
|||
* How to upload your geocaches onto a GPS device, and if necessary, translate them into different formats |
|||
== GPX == |
|||
The GPX format is the main tool being used for the collection and exchange of GPS data by geocache users. This is an XML based data format that permits the easy exchange of GPS data between software and web services via the internet. |
|||
The formatting allows the data to be accepted by the majority of GPS units on the market without incurring any major compatibility issues. |
The formatting allows the data to be accepted by the majority of GPS units on the market without incurring any major compatibility issues. |
||
The uploaded data points from event participants will be formatted into the open standard GPX (the GPS |
The uploaded data points from event participants will be formatted into the open standard GPX (the GPS Exchange Format). This will permit smooth data exchange between multiple GPS units regardless of the manufacturer. |
||
The following is an example of GPX data, demonstrating the structure and common tags used. In the example you can see that this is a geocache located in Lake Garibaldi Park: |
|||
=== Architecture of GPX === |
|||
GPX schema was initially released in 2002, and it became the GPS standard in August 2004. These files contain a description of what’s inside so they can be understood by various programs and users. The data can be manually converted, or software and web pages will provide the conversions to GPX. |
|||
The following is an example of GPX demonstrating the structure and common tags used. |
|||
<pre> <?xml version="1.0" ?> |
<pre> <?xml version="1.0" ?> |
||
<gpx |
<gpx |
||
| Line 32: | Line 39: | ||
</gpx> |
</gpx> |
||
</pre> |
</pre> |
||
GPX schema was initially released in 2002, and it became the GPS standard in August 2004. These files contain a description of what’s inside so they can be understood by various programs and users. Most GPS units will automatically generate their points in GPX format but in the odd case that they don't, there are a couple of ways to translate the format into or out of GPX. |
|||
==Converting different formats== |
|||
===GPSBabel=== |
|||
GPSBabel is an open-source program that allows for tracks, waypoints, and routes to be transferred from various types of GPS units and file formats. GPSBabel has both command-line and graphical interfaces, and the command line allows for easier batch processing. The main draw of this program is that it can convert between multiple format types, and can both download and upload points to/from most GPS units. GPSBabel uses the GNU Public License, and as such, the program can be altered by any user to their liking, as long as the changes are shared in any redistribution. This allows other open-source programs like QGIS to have GPSBabel integrated into their system as a plugin. |
|||
You can download the application [http://www.gpsbabel.org/ here] |
|||
You can view a more comprehensive list of compatible ''Garmin'' units [https://www.gpsbabel.org/htmldoc-1.7.0/fmt_garmin.html here] |
|||
===GPSVisualizer=== |
|||
GPSVisualizer is a website dedicated to converting between GPX files, plain text/CSV, and KML files (for Google Earth, we will talk about this in a later section [[#Mapping in Google Earth]]). It also offers other features, such as plotting points, but we will not be using that in this tutorial. |
|||
To access the tool we will be using, go [https://www.gpsvisualizer.com/convert_input here] |
|||
Although we are not using the other tools, I encourage you to look around and explore the options presented. |
|||
==Mapping== |
|||
For this tutorial, an emphasis will be placed on the open-source QGIS software, but we will also explore using Google Earth. |
|||
===Quantum GIS=== |
===Quantum GIS=== |
||
QGIS was started in May 2002 and made available for download through peer sharing networks. Many versions have been developed since the initial program. Now QGIS is a fully functioning Geographic Information System that runs on all main platforms such as Linux, Mac, Windows and Unix. The program supports a variety of data, including vector, raster, and database formats. QGIS is licensed under the GNU Public Licence (MicroResources, 2008). |
|||
For the purpose of this tutorial, the Open Source QGIS (Quantum GIS) software will be used to produce maps and information tables. However, other open source software can be used such as Grass GIS. |
|||
QGIS is a reliable GIS program that allows for simple navigation through the tools and a very intuitive learning process. It has a full graphical user interface so users regardless of experience level can utilize the software. Hardware requirements are minimal for QGIS, so the vast majority of desktops will be able to operate the program on Windows, Mac and Linux operating systems. |
|||
QGIS was started in May 2002 and made available for download through peer sharing networks. Many versions have been developed since the initial program. Now QGIS is a fully functioning Geographic Information System which runs on all main platforms such as Linux, Mac, Windows and Unix. The program supports a variety of data including, vector, rasters and database formats. QGIS is licensed under the GNU Public Licence. (MicroResources, 2008) |
|||
QGIS is available for download [http://www.qgis.org/ here] |
|||
QGIS is a reliable GIS program which allows for simple navigation through the tools and a very intuitive learning process. It has a full graphical interface so users regardless of experience level can utilize the software. Hardware requirements are minimal for QGIS, so the vast majority of desktops will be able to operate the program on Windows, Mac and Linux operating systems. |
|||
====QGIS Plugins==== |
|||
QGIS available for download here http://www.qgis.org/ |
|||
As with GPSBabel, the public license allows users to alter the program and add whatever they like to their version, because of this, QGIS has a suite of downloadable plugins that offer features and services that are not in the base version of QGIS. GPSTools is one of these plugins, and it is the one we will be using in this tutorial. GPSTools operates by using GPSBabel to download or upload points between GPS units. The only drawback to this is that it only seems to be operating with GPX files. |
|||
=== |
===Google Earth=== |
||
The other mapping program we will be exploring in this tutorial is Google Earth. Google Earth can act as a pseudo-GIS in terms of mapping capabilities. There is enough to make a fairly basic map, but it will be nowhere near the detail as those that can be made in QGIS. |
|||
The GPSBabel is an open source program that allows for tracks, waypoints, and routes to be transferred from various types of GPS units. GPSBable has both command-line and graphical interface, which would allow for easier batch processing. The program takes the data and converts it from proprietary formats to the open GPX format. This format allows people with incompatible GPS units to easily share data, and is already popular with the geocaching community for this reason. Since GPX is a widely accepted format, it works with other open source programs such as OpenStreetMap and Google Earth |
|||
Google Earth uses KML files to operate, and if you recall this is one of the types of files that are converted with GPSVisualizer. This conversion is necessary, as Google Earth only works with KML and does not have support for GPX files. |
|||
You can download the application here [http://www.gpsbabel.org/download.html |
|||
I will be covering the web version of Google Earth, but all of this can be done on the desktop version as well. To access Google Earth, click [https://earth.google.com/web/ here] |
|||
===Goals of the tutorial=== |
|||
#Provide an introduction to GPX and its capabilities for novice users |
|||
#Encourage the free distribution of data for geocaching |
|||
#Utilize open source software and promote its development and awareness |
|||
#Uphold OGC standards of metadata and file sharing |
|||
=Downloading data= |
|||
=Getting Started= |
|||
The first thing that you must do is download the points you want from [https://www.geocaching.com/play/search geocaching.com] or any other geocaching websites that you come across. Then they will be converted into whichever format that you would like. |
|||
*Ensure GPS unit Map Datum is set to WGS84 when collecting waypoints |
|||
*Coordinates can be off, so expect a geocache to be within 5 meters, on occassion up to 15 meters |
|||
# On the website, use the search bar to search geocaches near the location you wish to go. |
|||
==Upload your waypoints== |
|||
# Choose the geocache you wish to download. |
|||
Ensure that your GPS unit comes with the connecting cable to hook up to your computer. Entering information manually is extremely time consuming, and easily prone to error. Wrong numbers will result in you wandering around hopelessly searching for the geocache. |
|||
#* Download as many as you'd like, the more the merrier. |
|||
Connect the unit to your PC and upload the waypoints. There is usually a feature to select all waypoints which will upload all the points at one time into a single file. If you wish to upload only one waypoint, then select this specific point from the menu for upload. |
|||
#:[[File:Geocachingwebsite1.png|500px|thumb|center|Example of what it will look like after searching for geocaches]] |
|||
# Choose 'Download GPX' |
|||
#* You should save all these points to the same folder, it will make everything easier later. |
|||
[[File:Geocachedownload.png|500px|thumb|center|How to download the geocache GPX file]] |
|||
==File creation== |
|||
Select an appropriate location on your computer for saving the file; it will have to be accessed to permit the GPX conversion in future steps. Make sure that your chosen file name is short and concise. You may want to add extensions onto the original name when converting the file in the following steps. This will help prevent any character limitations. Make sure that the format of the file is set to a plain-text ( tab or comma separated) format such as at .txt file. The simple heading format will enable the data to be read correctly and efficiently. |
|||
Extra information such as symbols and colours can be also added at a later time. You can choose to store your raw data into a spreadsheet, so the fields can be altered at your discretion. Information such as altitude, symbols and descriptions of points can be incorporated. |
|||
See the '''Section 4.4 -Adding extra data to your file before processing to GPX''' |
|||
'''NOTE:''' If you would like, there are some websites that can merge GPX files into one, or you can do it by altering the GPX through the text editor. We will also cover how to merge them once in QGIS. |
|||
=Converting Your Files= |
|||
==Using a web page utility - GPS Visualizer== |
|||
There are many web-based utilities freely available online. This particular example will be demonstrated using the GPS Visualizer tool which will convert a GPS file to the GPX format. However, the steps remain consistent as your GPS file must always be uploaded to the web application for processing. |
|||
=Map making= |
|||
http://www.gpsvisualizer.com/convert_input |
|||
You should now have all your GPX files downloaded and in one folder. The next step is to load the points into QGIS or Google Earth to make a map. If you wish to skip this step and immediately load the points onto the GPS, go to section [[#Upload points to GPS]]. |
|||
==Mapping in Google Earth== |
|||
====Instructions==== |
|||
Google Earth offers a simple way to overlay point locations onto their satellite imagery. The maps that you can create through this software aren't necessarily going to be as in-depth and detailed as QGIS, but they are simple and do the trick in much less time than with QGIS. One perk of this software is that there is substantially less to figure out and troubleshoot. |
|||
===Converting to KML=== |
|||
# Select the Browse button at the top of the window; this will open a new window where you can select your GPS file from your computer. |
|||
Unfortunately, Google Earth only supports the loading of KML files, rather than the GPX files you just downloaded. This is an easy fix though, through the use of GPSVisualizer it is a quick translation. |
|||
# Select the Output format as GPX |
|||
# Change the drop down menu of Geotag points to select the No option. |
|||
# Leave all remaining selections as the default and/or blank. |
|||
# Select the Convert button at the top right of the window.Your file is now processed into a GPX file and a new window will appear. |
|||
#Right-click on the link and choose 'Save Target As' |
|||
#Name the file ‘Test’ and make sure to add a .txt extension after the name. |
|||
::The ‘Save File As’ drop-down menu must show ‘All Files’ for this to happen. |
|||
''Example of File name : text.txt'' |
|||
# Head to [https://www.gpsvisualizer.com/map_input?form=googleearth GPSVisualizer]. |
|||
You have now successfully converted your GPS file into a GPX format text file which can be openly exchanged. |
|||
#* This is the form that translates into KML, we will discuss some other options in [[#Loading in using a CSV]]. |
|||
# Change the 'Output file type' from '.kmz (zipped)' to '.kml (uncompressed)'. |
|||
# Add your GPX files containing the geocache data; you can load in up to 10 at once. |
|||
# Click 'Create KML file' and download your new data. |
|||
[[File:Gpsviskml.png|500px|thumb|center]] |
|||
===Importing KML into Google Earth=== |
|||
==Using an open source application - GPSBabel== |
|||
You now have all your geocache locations saved as KML files, here's how to get it into Google Earth: |
|||
# Open [https://earth.google.com/web/ Google Earth]. Remember that I will only be discussing the web version. |
|||
# On the left side of the screen, select the 'Projects' menu. It'll look like a placemark, there will be an image showing its location if you are having trouble. |
|||
# If you have not already created a project, click 'Open' and choose 'Import KML file from computer'. |
|||
# If you do already have projects created, create a new project and choose 'Import KML file from computer'. |
|||
# Choose the KML files you just created and let it load in. |
|||
[[File:GEloadKML.png|500px|thumb|center]] |
|||
===Finalizing the map=== |
|||
This software provides both the GUI (graphical user interface) and Command-Line interface depending on your preference. For simplicity, the example will use the GUI to translate the files to GPX. |
|||
Now that your geocaches are in Google Earth, we can begin to make the map look a bit better. Google Earth is not as customizable as QGIS but you can still change symbology and alter the satellite imagery slightly. |
|||
Open up the GUI application once the file has been downloaded and unzipped to your computer. |
|||
# In your project, open up the waypoints menu. |
|||
The form is basic, but does offer many choices for input and output file formats. You can convert the comma/tab-separated file that was created above when uploading from the GPS device, OR you can convert the waypoints directly from your connected GPS device. |
|||
#:[[File:WaypointsGE.png|250px|thumb|center]] |
|||
# Hover over the geocaches you wish to change the symbology, and choose 'Edit feature'. |
|||
# From here you can change things like font, and icon. |
|||
'''NOTE:''' On the far left panel, below the 'Projects' tab, there is a tab titled 'Map style'. You can use this to alter what is shown on the satellite imagery. You can turn things on and off like roads and other overlaid data. |
|||
====Instructions==== |
|||
#a. Input File from Computer.The input file format needs to be specified, in our example above the selection would be Comma Separated file. This is selected from the top drop-down menu. In the second menu below, select the file’s location on your computer. |
|||
##b. Input File from GPS device. The user also has the choice of selecting the particular GPS device as the input from the drop-down menu. This would provide a direct conversion to GPX straight from the device. Make sure the radio box is selected to download the waypoints from your device. |
|||
# Input Options. This allows you to select more specific features when acquiring your file. Details of each feature are explained in the help files.The first option GPS datum can be selected as this is the default datum that should be used. |
|||
# Output File. The name of the format in the drop-down menue is GPX XML which will convert the input file to a .gpx format. |
|||
::Specify the location of where you would like the new GPX file saved on your computer. |
|||
#Select the ‘Let Go’ button to run the application. |
|||
::A prompt will then appear telling you the conversion is successful. |
|||
At this point, there is not much else you can do. Take a screenshot of your location with all your geocache locations. If you are using the desktop application you can do a bit more in turns of generating a legend and an actual map, but unfortunately, that is not yet a feature in the web version. |
|||
==Using an open source application –QuantumGIS== |
|||
Using the GPS Tools plugin |
|||
from the GPS Tools select the Load GPX file tab. |
|||
This tool is using GBSBabel as a utility within QGIS so the same instructions are applicable when selecting your input and output file details from the previous example. |
|||
==QGIS== |
|||
=Creating Maps= |
|||
Unlike Google Earth, QGIS supports the direct loading of GPX files into the software; however, you must first install the plugin 'GPSTools'. This is quite simple, and I will walk you through it here. This process can also be done by converting the GPX files into a CSV with GPSVisualizer, and loading it into QGIS like that, I will walk you though that after. |
|||
The following information provides three differnt options for generating maps with your newly formated data. The first uses QGIS applications as a base to add image layers to your waypoints. The second using a web mapping service from NASA which provides a high resolution global image to demonstrate another method of acquiring layers. The third method demonstrates a conversion into the KML format so the waypoints can be produced onto the Google Earth service. |
|||
==Using QuantumGIS== |
|||
====Instructions==== |
|||
'''Step 1''' Load Vector Layer |
|||
===Loading in with GPSTools=== |
|||
::In the new window find the location of your GPX file and open it. This has now loaded the waypoints into QGIS for you to manipulate. The file name appears in the Legend to the left of your screen. The check box within the legend is to toggle displaying the vector layer. The actual points are displayed in the large projection window. |
|||
# Click the 'Plugins' tab on the menu bar and go to 'Manage and Install Plugins...' menu. |
|||
#:[[File:Pluginsbar.png|500px|thumb|center]] |
|||
# Search for GPSTools. The plugin will already be enabled, you just have to click on the checkmark. |
|||
#:[[File:Screen Shot 2020-09-24 at 8.34.13 PM.png|500px|thumb|center|Note the checkmark next to the name]] |
|||
# Now load up the GPSTools plugin by selecting it from the 'Vector' tab on the menu bar. It should be next to the 'Plugins' tab. |
|||
You will be met with the GPSTools interface, for now, we will just be dealing with the 'Load GPX File' tab, but feel free to look into the other tabs. Repeat this step as many times as needed to load all your files. We will discuss the 'Download' and 'Upload' tabs in a later section. Note that there seems to be an issue with the 'Import Other File' tab, I have tried it with multiple different files (that aren't GPX) and QGIS had crashed, it could just be my machine. Also, note the final tab 'GPX Conversion', this tab allows waypoints, tracks, and routes to be simultaneously converted between each other. This only works with GPX files. |
|||
'''Step 2''' Symbols |
|||
You will likely have multiple layers now, don't worry, we will merge all the layers into one soon (section [[#Merging file once in QGIS]]). This will also make it so in the end, you will only have one GPX file being transferred into your GPS. |
|||
::Expand the vector layer in the legend. This will show what symbol is being used to display the waypoints. Double-click on the vector name and a new window will appear. |
|||
===Loading in using a CSV=== |
|||
'''Step 3''' Layer Property |
|||
# Head to [https://www.gpsvisualizer.com/convert_input?convert_format=gpx GPSVisualizer] and choose the files you wish to convert. Keep in mind that you can only upload 10 at a time. |
|||
#* Ensure that you have selected the 'Output format' as 'Plain text' and that you have changed the 'Plain text delimiter' from 'tab' to 'comma'. This will make it so that the data is converted into a CSV instead of a text file. Don't worry if you miss this step, text files can be opened in most spreadsheet software with a small hassle. |
|||
#: [[File:Gpsvisualizer1.png|500px|thumb|center]] |
|||
# If you wish to edit the spreadsheets, go ahead. Here you can merge them into one, add better descriptions, or whatever you like. Just make sure that you don't alter the column titles, as they are required for one way of returning the file to a GPX. |
|||
# Now in QGIS, click the 'Processing' tab and check on 'Toolbox'. There will be a panel on the right that pops out and contains all the tools present in QGIS. |
|||
# In the search bar, search 'Create points layer from table' and select the tool. |
|||
## Click the '...' for the input layer to search for the table of geocaches. |
|||
## For the X and Y field, choose longitude and latitude respectively. These are values directly from your input table, so if they aren't options you may have added the wrong table. |
|||
## Set the CRS as WGS 84 (This will likely already be chosen) |
|||
## Save the file to your folder by choosing the '...'. I would recommend saving it as a .shp; however, it is possible to save it as a GPX here, but I have found that to be extremely unreliable and hasn't worked very well for me. |
|||
[[File:Pointsfromtable.png|500px|thumb|center]] |
|||
===Merging files once in QGIS=== |
|||
::This window allows the user to change all the element associated with a layer. The first tab is Symbology. Label names can be added and a variety of different point symbols can be selected. The Style Options are how the selected symbol will be displayed in fill and outline colour. Feel free to be creative, as these options can really enhance a map and make important features stand out. |
|||
If you have a bunch of different layers representing your geocaches, I would recommend merging them into one file. This will make symbolizing them much easier and faster, and also make it so that transferring them back into GPX and onto the GPS is fast and efficient. This can be done easily using the 'Merge vector layers' tool from the toolbox. |
|||
:Note: There are many available options within layer properties; trial and error along with the use of the Help files will allow you to master the program. |
|||
# Like creating points from a table we did in the last step, search the toolbox for 'Merge vector layers'. |
|||
'''Step 4''' Adding a background |
|||
# Click the '...' and choose all the layers you wish to merge. These will be all the GPX layers that you loaded in previously. |
|||
#* If when you press 'OK' the tool disappears, don't worry, it didn't crash, it was just moved to behind your QGIS window. This happens to me on a Mac so look around a bit, it's there somewhere. |
|||
# Set the CRS as WGS 84 and save it to your folder. Again, I would suggest saving it as a .shp. |
|||
#:[[File:Mergetool.png|500px|thumb|center]] |
|||
You should now have a new layer that is all the geocache locations in one. If you would like, you could remove all the other layers, or simply turn them off by clicking the checkmark next to their name. This just relieves clutter. |
|||
::All of the waypoints are displayed and your symbols have been chosen to showcase your geocache location. To print off the map and provide some area distinctions, include a background such as topography or an aerial photo. To acquire such files, the internet is a very useful tool. There are varieties of websites, many from the government, from which you can choose. These images or raster layers have geographical coordinates and can be added quite easily. |
|||
===Adding a basemap=== |
|||
*Weblinks to Goverment map files/images |
|||
All of your points will now be displayed in QGIS. You should now add a satellite basemap so that you can gauge the surroundings of the geocache locations. |
|||
'''Step 5''' Loading an image |
|||
# To do this, install the plugin 'QuickMapServices' (QMS), much like you did with the 'GPSTools' plugin; however, this plugin is not already installed, so you have to go through that process first. Don't worry, it only takes a couple of seconds. |
|||
# The tool will now be available in your toolbar along the top. You may need to play around with some of the options to get it to show, but it will appear as a globe: [[File:Quickmaplocation.png|100px|thumb|center]] |
|||
# I would suggest adding more basemaps to the tool by going to QMS settings > More services > Get contributed pack. This step is not necessary, but it adds a much wider selection of basemaps, including much of the ESRI and the Google library. |
|||
#:[[File:Getcontributedpack.png|500px|thumb|center]] |
|||
# You can now choose from any of the basemaps available through QMS, for this tutorial I would suggest the ESRI or Google satellite imagery. I have found that the ESRI imagery runs better. |
|||
# From the 'layers' panel on the left, ensure that the basemap is below your GPX files. |
|||
===Finalizing the map=== |
|||
::Within QGIS, there is an Add Raster button. This will allow you to add a JPEG, TIFF or GIFF image as a raster layer. These images can be acquired from the list in the ''Reference'' section. |
|||
With all the points and the basemap added, you should have everything you need to create a helpful map. In this tutorial, I will show you how to make some quick and easy changes to your map, as well as a simple introduction into how to export the map so that you can print it. |
|||
====Symbology==== |
|||
==Using a Web Mapping Service -OnEarth== |
|||
It may be difficult to see some of your geocaches, especially if they are present in a wooded area. Here, I will walk you through how to change the symbology so that they will pop a bit more. |
|||
OnEarth is a Web Mapping Service (WMS)which is home to a high resolution global image of earth from NASA. This mosaic is known as the WMS Global Mosaic and is composed of more than 8200 satellite images from Landsat7. This will be used to demonstrate an example of how to use a WMS to provide a background image in QGIS. |
|||
# Right-click on the layer containing the geocache points. This will be in the left panel. |
|||
====Instructions==== |
|||
# Select 'Properties' at the bottom of the list. |
|||
# Load the vector data from your GPX file |
|||
# Once in the properties window, there will be a bunch of options and menus that you can sort through. For now, click on the 'Symbology' menu in the left panel. |
|||
#Select the button Add WMS Layer |
|||
# From here it is all about how you wish to set your symbology. There are a few things to note: |
|||
#Select the New button at the top of the window |
|||
#* Choose a colour that is in contrast to the surroundings. Red is often a good starter, but it is not always necessary as it can be a bit ''too'' harsh sometimes. |
|||
#Create a name for the service such as ‘OnEarth World Map’ |
|||
#* You can alter the actual symbol itself, there is a decent library of symbols already in QGIS and you shouldn't have an issue with this map. If you are looking for other symbols, they can be loaded in as an SVG file. I won't go into more detail, but check out [https://labs.mapbox.com/maki-icons/ this site] or [https://wiki.osgeo.org/wiki/OSGeo_map_symbol_set this one] if you are interested in learning more. |
|||
#Next, enter the URL http://wms.jpl.nasa.gov/wms.cgi. which sends the request and click OK |
|||
#Make sure the server ‘OnEarth’ is selected in the drop down menu and click Connect. |
|||
#A list of layers will be retrieved from the server. Select the first one titled WMS Global Mosaic. |
|||
#Click the Add button at the bottom right of the screen. |
|||
#It will take a moment to retrieve the data, but the resulting image is very impressive. |
|||
====Labels==== |
|||
You can now use the Zoom tool to bring your waypoints into a larger scale. Just remember that the data has to be retrieved over the internet, so be patient. |
|||
Labelling is always useful, it will help you determine what's what, and makes life easier when looking at a map. |
|||
# Like symbology, head to the properties menu, this time select 'Labels' from the left panel. |
|||
==Using Google Earth -KML file format== |
|||
# There likely won't be anything in the menu except a single drop-down menu. Click the menu and select 'Single labels'. |
|||
The KML (Keyhole markup language) is another format based on the XML standard. This file format is mainly used for the display in browsers such as Google Earth and Google Maps. The tag structure is very similar to the GPX format, however they are case sensitive. |
|||
#* This will make it so that the labels apply to all points based on the same criteria. You can alter criteria depending on the 'rules' by choosing the 'Rule-based labelling' option. |
|||
# All the fields will automatically fill, so if you don't want to you don't have to change anything, your points will be labelled. However, here are a few tips: |
|||
#* Make sure the value is set to 'name', or whatever you want the label to say. |
|||
#* You can increase the font size if you'd like, it usually starts small. |
|||
#* I would recommend turning on a buffer. This will add white to behind the label, making it easier to read. I find this often corrects for having a small font size, so check to make sure it isn't too big and covering up too much of the map. |
|||
#* You can change the placement if you'd like. |
|||
[[File:SymbologyQGIS.png|500px|thumb|center]] |
|||
====Print layout==== |
|||
Using a web utility to convert a GPX or plain text file will allow for a very simple result. Again, there are a variety available on the web or you can choose to manually convert the file using KML tutorials. |
|||
Now it's time for the most frustrating part of any map making, getting the map to look nice. If you'd like to skip the step of adding a legend, scale bar, and north arrow, you can just screenshot the part of the map that you want. At this point, the labels and symbology are what they will be on the final map, so this last step isn't necessarily needed. I will have a picture at the bottom of this section with the important tools highlighted, so don't worry if the steps are confusing. |
|||
# Along the toolbar, next to the save icon there is a tool that's called 'New Print Layout'. Choose this and give it a name. |
|||
The following is an example of KML to show the structure and basic tags used |
|||
# You will be welcomed by a completely new window. Note the tools along the left side of the window. These are how you will add the map frame, legend, scale bar, and north arrow. |
|||
<pre><?xml version="1.0" encoding="UTF-8"?> |
|||
#:[[File:QGISmap.png|500px|thumb|center]] |
|||
<kml xmlns="http://www.opengis.net/kml/2.2"> |
|||
# The first squared tool adds a map frame. You can add this however you'd like, it will automatically add the map that you created with your geocache locations. |
|||
<Placemark> |
|||
# The legend, scale bar, and north arrow can now all be added. They will automatically be related to the map frame you added. |
|||
<name>Simple placemark</name> |
|||
#* You may add these wherever you'd like, but it's easiest if you leave some white space on the layout. |
|||
<description>Attached to the ground. Intelligently places itself |
|||
# If you're legend is full of layers that aren't being shown on the map, go to the legend properties. |
|||
at the height of the underlying terrain.</description> |
|||
# This can be done by right-clicking on the legend, or in the items panel on the right, choosing the legend and navigating to 'Item properties'. |
|||
<Point> |
|||
# From the legend properties, scroll down and check 'Only show items inside of linked map'. This will remove all the excess layers. |
|||
<coordinates>-122.0822035425683,37.42228990140251,0</coordinates> |
|||
</Point> |
|||
Now that your map is completed, you may use the tools along the top toolbar to either print, export as image, or export as PDF. |
|||
</Placemark> |
|||
</kml> |
|||
</pre> |
|||
=Uploading points to GPS= |
|||
By this point in the tutorial, you should have: |
|||
# A map with all your geocache locations (unless you skipped ahead) |
|||
# GPX file(s) with all you geocache locations |
|||
#* If you skipped ahead, or used Google Earth instead of QGIS, you may have multiple GPX files. |
|||
From here, you now just have to get that file(s) onto your GPS unit. |
|||
If you used Google Earth, you should already have GPX files. Skip to section [[#Uploading to GPS]]. |
|||
If you do not have a unit that works with GPX, ensure that you have a GPX file then skip to section [[#Uploading to GPS]]. |
|||
First, plug your GPS into your computer. |
|||
'''NOTE: '''Make sure that you are using the correct connecting cord. My computer did not recognize my unit until I switched to a Garmin cord, I am not sure if this is a common issue (I would assume it isn't, I haven't been able to find much on it) or if the cords I was using before were damaged in some way. |
|||
==Straight from QGIS== |
|||
If you are already in QGIS with your one file containing all your geocache locations, this should be quite simple. |
|||
'''NOTE: '''QGIS only works with uploading GPX files, so your unit operates with a format other than GPX you may want to skip forward; however, if you have an SHP in with all your locations in QGIS, see the following step to convert it into a GPX, which can then be converted using GPSBabel. |
|||
===If saved as SHP=== |
|||
If your file is saved as an SHP like I said you should do, there is a quick export that you must do first. |
|||
# Right-click on the layer with all your geocache points. |
|||
# Select 'Export' > 'Save Feature As...', and choose to save it as a GPX. |
|||
#* Note that you will likely have to check the option 'GPX_USE_EXTENSIONS' to on. |
|||
===If saved as GPX=== |
|||
If you saved the file as a GPX before, or just finished the previous step, we will be using the GPSTool to upload the GPX to the GPS. By the end of this section, you will have the points on your GPS. |
|||
# Load GPSTools. |
|||
Download Google Earth http://earth.google.com/ |
|||
# Go to the 'Upload to GPS' tab. |
|||
# Choose the GPX file that you created, and choose the correct device and port. |
|||
#* Note that the only device that is pre-coded is the 'Garmin Serial', you can add new devices by choosing the edit devices and coding it in. Check out [https://docs.qgis.org/2.8/en/docs/user_manual/working_with_gps/plugins_gps.html this] website for help doing this. |
|||
==Using GPSBabel== |
|||
===Converting to different formats=== |
|||
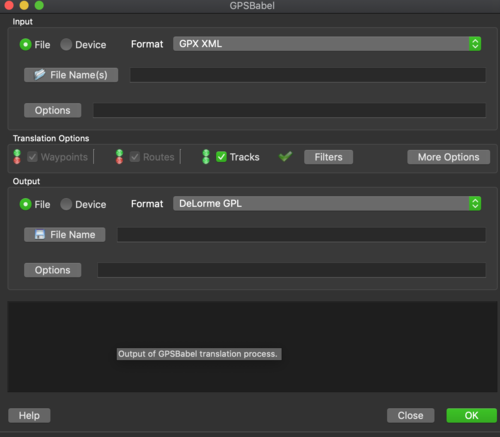
# Ensure that your 'input' and 'output' are checked as 'file'. |
|||
# Load your GPX file. |
|||
# Choose the format you'd like to translate to and save the file. |
|||
[[File:BabelFiletoFile.png|500px|thumb|center]] |
|||
===Uploading to GPS=== |
|||
'''Instructions''' for GPS Visualizer |
|||
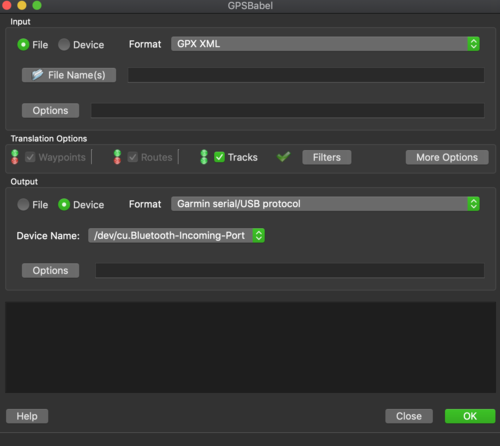
# Ensure that you 'input' and 'output' are checked as 'file' and 'device' respectively. |
|||
http://www.gpsvisualizer.com/map_input?form=googleearth |
|||
# Load your file that you wish to be uploaded. This will be in GPX or another format that you just translated to. |
|||
# Choose the correct format (Garmin serial/USB protocol is likely to be good). If you need help with this, check the 'Help', it will take you to the documentation. |
|||
# Choose the correct output device (Your GPS). |
|||
[[File:BabelFiletoDevice.png|500px|thumb|center]] |
|||
#Establish Map Parameters |
|||
##Set output format to ''Google Earth'' |
|||
##Choose the ''Uncompressed'' (.kml) for file format |
|||
##Create a name for your Google Earth document |
|||
#Track Options |
|||
##You may keep all the default settings. A track can be generated if there are several waypoints in the dataset. |
|||
##The ''Opactiy'' can be changed to 0% if no track is desired |
|||
#Waypoint Options |
|||
##For the menu Show Waypoints select ''All'' |
|||
#Upload Your Files |
|||
## Locate the file on your computer to be uploaded and formatted |
|||
# Create the KML file |
|||
#You can now click on the link of the file generated and it will automatically open in Google Earth (if it is installed on your machine) OR Right-click and ''Save Target As'' to save the file to your computer |
|||
==Adding extra data to your file before processing to GPX== |
|||
[[Category:Addextra]] |
|||
These additions can be made to the uploaded data files using a spreadsheet program and are performed ''before'' the GPX conversion. The files should be opened into the program and the standard headings of Name, Latitude, and Longitude should populate the first row. The extra fields can then be added into new columns and populated for each waypoint. |
|||
'''Description Field''' |
|||
Needs to be called ‘desc’ to be recognized. The entry for each point will be displayed next to the waypoint on the map. A description field can be composed of plain text or can consist of a formula which builds upon other field entries. An example of this would be setting the desc field equal to the Name field plus the Altitude field. Thus displaying the full name of the feature and its altitude when mapped. |
|||
'''Add Colour''' |
|||
Each waypoint can have its own unique colour. You will need to create a Colour field in your spread sheet. Recognized formats consists of HTML values (black, green, etc.) or the RGB values (#82B3CE, #00F63CD, etc.) |
|||
'''Symbols''' |
|||
This feature can only be utilized in such programs as Google Maps and Google Earth, and are not applicable to simple JPEG formats. A symbol heading will need to be added to your spreadsheet. A list of available symbols is available via the web so that the symbol names are matched to the pre-defined symbols. For this example, the symbols square and triangle are widely accepted. These entries would display markers of the chosen colour and symbol you have defined in your spreadsheet. |
|||
=References= |
=References= |
||
Foster, D (2008). GPX for developers. Retrieved October 23, 2008, from The GPS exchange format Web site: http://www.topografix.com/gpx_for_developers.asp |
Foster, D (2008). GPX for developers. Retrieved October 23, 2008, from The GPS exchange format Web site: http://www.topografix.com/gpx_for_developers.asp |
||
MicroResources, (2008, July). |
MicroResources, (2008, July). Quantum GIS. Retrieved October 18, 2008, from QGIS.org Web site: http://qgis.org/index.php?option=com_content&task=blogsection&id=1&Itemid=99 |
||
===Helpful Web Links=== |
===Helpful Web Links=== |
||
*GPX [http://www.topografix.com/gpx.asp] |
*GPX [http://www.topografix.com/gpx.asp] |
||
*XML [http://www.w3.org/XML/] |
*XML [http://www.w3.org/XML/] |
||
*FOSS4G [http://2009.foss4g.org/] |
|||
*QuantumGIS [http://www.qgis.org/] |
*QuantumGIS [http://www.qgis.org/] |
||
*GPSBabel [http://www.gpsbabel.org/download.html] |
*GPSBabel [http://www.gpsbabel.org/download.html] |
||
*GPS Visualizer [http://www.gpsvisualizer.com/] |
*GPS Visualizer [http://www.gpsvisualizer.com/] |
||
*OnEarth [http://onearth.jpl.nasa.gov/] |
|||
*Google Earth [http://earth.google.com/] |
*Google Earth [http://earth.google.com/] |
||
*Google KML [http://code.google.com/apis/kml/documentation/] |
*Google KML [http://code.google.com/apis/kml/documentation/] |
||
[[Category:Tutorials]] |
|||
'''Sites for georeferenced images''' |
|||
*NRCAN GeoBase [http://www.geobase.ca/geobase/en/data/index.html;jsessionid=D4DB74883B2785E1FE31DFF5DB2763A8] |
|||
*CanMatrix [http://geogratis.cgdi.gc.ca/geogratis/en/product/search.do?id=10119] |
|||
*Atlas Canada [http://atlas.nrcan.gc.ca/site/english/index.html] |
|||
Latest revision as of 13:04, 16 October 2020
Contents
Background
Geocaching is not only a fun hobby, but it is also a way to connect people from all walks of Earth. Going on a road trip? Why not stop at some interesting locations to hunt for geocaches, where dozens of others have also stopped and left notes or other small gimmicks. Geocaching has come a long way since it first began. The dedicated geocaching app has multiple features that can aid in a user's search, however, most of these are paid services. For instance, the ability to view maps and create lists of geocaches is only available in the 'premium' package. In this tutorial, I will walk you through some simple steps and processes so that you can geocache as well, if not better with the 'basic' package (free) than someone who has paid for the 'premium' package (paid).
This tutorial will cover the following:
- How to download waypoints from geocache.com
- How to use various open-source software to create simple maps which can be used to assist the hunt
- How to upload your geocaches onto a GPS device, and if necessary, translate them into different formats
GPX
The GPX format is the main tool being used for the collection and exchange of GPS data by geocache users. This is an XML based data format that permits the easy exchange of GPS data between software and web services via the internet.
The formatting allows the data to be accepted by the majority of GPS units on the market without incurring any major compatibility issues. The uploaded data points from event participants will be formatted into the open standard GPX (the GPS Exchange Format). This will permit smooth data exchange between multiple GPS units regardless of the manufacturer.
The following is an example of GPX data, demonstrating the structure and common tags used. In the example you can see that this is a geocache located in Lake Garibaldi Park:
 <?xml version="1.0" ?>
<gpx
 version="1.1"
 creator="TrailRepository - http://trail.brijn.nu"
 xmlns:xsi="http://www.w3.org/2001/XMLSchema-instance"
 xmlns="http://www.topografix.com/GPX/1/1"
 xsi:schemaLocation="http://www.topografix.com/GPX/1/1 http://www.topografix.com/GPX/1/1/gpx.xsd">
 <metadata>
  <name>Garibaldi Lake BC Canada</name>
  <desc>Geocache along Garibaldi Lake park.</desc>
  <author><name>John Doe</name></author>
  <link href="http://trail.brijn.nu/"></link>
  <time>2008-10-15T19:43:44Z</time>
 </metadata>
 <wpt lat="49.957361" lon="-123.119944">
  <ele>0</ele>
  <name>T.Head</name>
 </wpt><rtept lat="49.947633333" lon="-123.083983333">
  <ele>0</ele>
  <name>T01P29</name>
  </wpt>
</gpx>
GPX schema was initially released in 2002, and it became the GPS standard in August 2004. These files contain a description of what’s inside so they can be understood by various programs and users. Most GPS units will automatically generate their points in GPX format but in the odd case that they don't, there are a couple of ways to translate the format into or out of GPX.
Converting different formats
GPSBabel
GPSBabel is an open-source program that allows for tracks, waypoints, and routes to be transferred from various types of GPS units and file formats. GPSBabel has both command-line and graphical interfaces, and the command line allows for easier batch processing. The main draw of this program is that it can convert between multiple format types, and can both download and upload points to/from most GPS units. GPSBabel uses the GNU Public License, and as such, the program can be altered by any user to their liking, as long as the changes are shared in any redistribution. This allows other open-source programs like QGIS to have GPSBabel integrated into their system as a plugin.
You can download the application here
You can view a more comprehensive list of compatible Garmin units here
GPSVisualizer
GPSVisualizer is a website dedicated to converting between GPX files, plain text/CSV, and KML files (for Google Earth, we will talk about this in a later section #Mapping in Google Earth). It also offers other features, such as plotting points, but we will not be using that in this tutorial.
To access the tool we will be using, go here
Although we are not using the other tools, I encourage you to look around and explore the options presented.
Mapping
For this tutorial, an emphasis will be placed on the open-source QGIS software, but we will also explore using Google Earth.
Quantum GIS
QGIS was started in May 2002 and made available for download through peer sharing networks. Many versions have been developed since the initial program. Now QGIS is a fully functioning Geographic Information System that runs on all main platforms such as Linux, Mac, Windows and Unix. The program supports a variety of data, including vector, raster, and database formats. QGIS is licensed under the GNU Public Licence (MicroResources, 2008).
QGIS is a reliable GIS program that allows for simple navigation through the tools and a very intuitive learning process. It has a full graphical user interface so users regardless of experience level can utilize the software. Hardware requirements are minimal for QGIS, so the vast majority of desktops will be able to operate the program on Windows, Mac and Linux operating systems.
QGIS is available for download here
QGIS Plugins
As with GPSBabel, the public license allows users to alter the program and add whatever they like to their version, because of this, QGIS has a suite of downloadable plugins that offer features and services that are not in the base version of QGIS. GPSTools is one of these plugins, and it is the one we will be using in this tutorial. GPSTools operates by using GPSBabel to download or upload points between GPS units. The only drawback to this is that it only seems to be operating with GPX files.
Google Earth
The other mapping program we will be exploring in this tutorial is Google Earth. Google Earth can act as a pseudo-GIS in terms of mapping capabilities. There is enough to make a fairly basic map, but it will be nowhere near the detail as those that can be made in QGIS.
Google Earth uses KML files to operate, and if you recall this is one of the types of files that are converted with GPSVisualizer. This conversion is necessary, as Google Earth only works with KML and does not have support for GPX files.
I will be covering the web version of Google Earth, but all of this can be done on the desktop version as well. To access Google Earth, click here
Downloading data
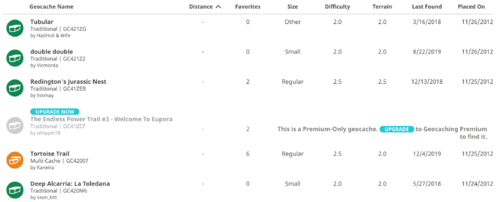
The first thing that you must do is download the points you want from geocaching.com or any other geocaching websites that you come across. Then they will be converted into whichever format that you would like.
- On the website, use the search bar to search geocaches near the location you wish to go.
- Choose the geocache you wish to download.
- Download as many as you'd like, the more the merrier.
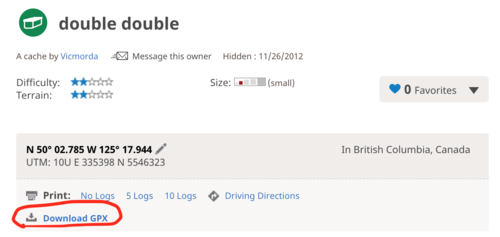
- Choose 'Download GPX'
- You should save all these points to the same folder, it will make everything easier later.
NOTE: If you would like, there are some websites that can merge GPX files into one, or you can do it by altering the GPX through the text editor. We will also cover how to merge them once in QGIS.
Map making
You should now have all your GPX files downloaded and in one folder. The next step is to load the points into QGIS or Google Earth to make a map. If you wish to skip this step and immediately load the points onto the GPS, go to section #Upload points to GPS.
Mapping in Google Earth
Google Earth offers a simple way to overlay point locations onto their satellite imagery. The maps that you can create through this software aren't necessarily going to be as in-depth and detailed as QGIS, but they are simple and do the trick in much less time than with QGIS. One perk of this software is that there is substantially less to figure out and troubleshoot.
Converting to KML
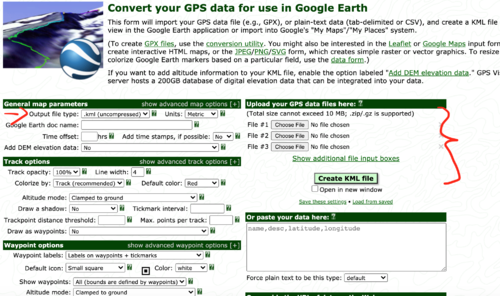
Unfortunately, Google Earth only supports the loading of KML files, rather than the GPX files you just downloaded. This is an easy fix though, through the use of GPSVisualizer it is a quick translation.
- Head to GPSVisualizer.
- This is the form that translates into KML, we will discuss some other options in #Loading in using a CSV.
- Change the 'Output file type' from '.kmz (zipped)' to '.kml (uncompressed)'.
- Add your GPX files containing the geocache data; you can load in up to 10 at once.
- Click 'Create KML file' and download your new data.
Importing KML into Google Earth
You now have all your geocache locations saved as KML files, here's how to get it into Google Earth:
- Open Google Earth. Remember that I will only be discussing the web version.
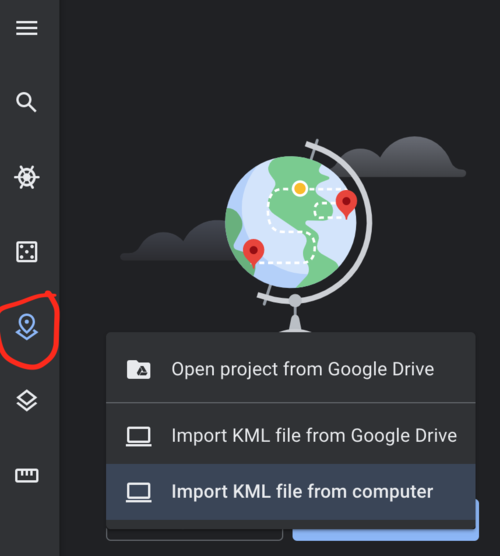
- On the left side of the screen, select the 'Projects' menu. It'll look like a placemark, there will be an image showing its location if you are having trouble.
- If you have not already created a project, click 'Open' and choose 'Import KML file from computer'.
- If you do already have projects created, create a new project and choose 'Import KML file from computer'.
- Choose the KML files you just created and let it load in.
Finalizing the map
Now that your geocaches are in Google Earth, we can begin to make the map look a bit better. Google Earth is not as customizable as QGIS but you can still change symbology and alter the satellite imagery slightly.
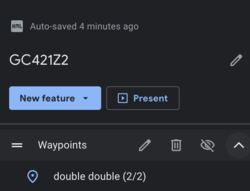
- In your project, open up the waypoints menu.
- Hover over the geocaches you wish to change the symbology, and choose 'Edit feature'.
- From here you can change things like font, and icon.
NOTE: On the far left panel, below the 'Projects' tab, there is a tab titled 'Map style'. You can use this to alter what is shown on the satellite imagery. You can turn things on and off like roads and other overlaid data.
At this point, there is not much else you can do. Take a screenshot of your location with all your geocache locations. If you are using the desktop application you can do a bit more in turns of generating a legend and an actual map, but unfortunately, that is not yet a feature in the web version.
QGIS
Unlike Google Earth, QGIS supports the direct loading of GPX files into the software; however, you must first install the plugin 'GPSTools'. This is quite simple, and I will walk you through it here. This process can also be done by converting the GPX files into a CSV with GPSVisualizer, and loading it into QGIS like that, I will walk you though that after.
Loading in with GPSTools
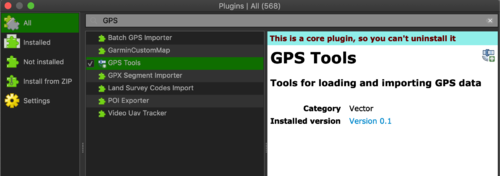
- Click the 'Plugins' tab on the menu bar and go to 'Manage and Install Plugins...' menu.
- Search for GPSTools. The plugin will already be enabled, you just have to click on the checkmark.
- Now load up the GPSTools plugin by selecting it from the 'Vector' tab on the menu bar. It should be next to the 'Plugins' tab.
You will be met with the GPSTools interface, for now, we will just be dealing with the 'Load GPX File' tab, but feel free to look into the other tabs. Repeat this step as many times as needed to load all your files. We will discuss the 'Download' and 'Upload' tabs in a later section. Note that there seems to be an issue with the 'Import Other File' tab, I have tried it with multiple different files (that aren't GPX) and QGIS had crashed, it could just be my machine. Also, note the final tab 'GPX Conversion', this tab allows waypoints, tracks, and routes to be simultaneously converted between each other. This only works with GPX files.
You will likely have multiple layers now, don't worry, we will merge all the layers into one soon (section #Merging file once in QGIS). This will also make it so in the end, you will only have one GPX file being transferred into your GPS.
Loading in using a CSV
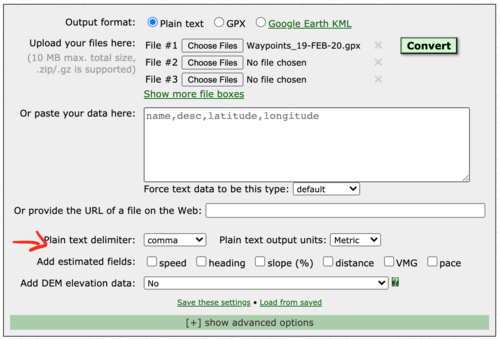
- Head to GPSVisualizer and choose the files you wish to convert. Keep in mind that you can only upload 10 at a time.
- Ensure that you have selected the 'Output format' as 'Plain text' and that you have changed the 'Plain text delimiter' from 'tab' to 'comma'. This will make it so that the data is converted into a CSV instead of a text file. Don't worry if you miss this step, text files can be opened in most spreadsheet software with a small hassle.
- If you wish to edit the spreadsheets, go ahead. Here you can merge them into one, add better descriptions, or whatever you like. Just make sure that you don't alter the column titles, as they are required for one way of returning the file to a GPX.
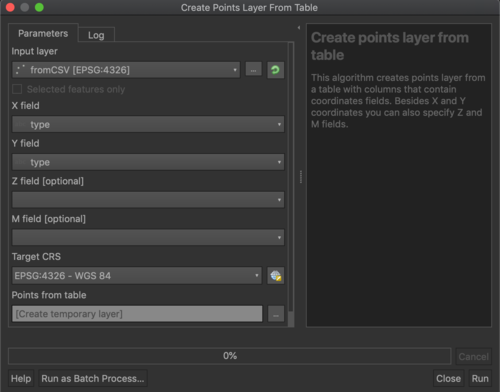
- Now in QGIS, click the 'Processing' tab and check on 'Toolbox'. There will be a panel on the right that pops out and contains all the tools present in QGIS.
- In the search bar, search 'Create points layer from table' and select the tool.
- Click the '...' for the input layer to search for the table of geocaches.
- For the X and Y field, choose longitude and latitude respectively. These are values directly from your input table, so if they aren't options you may have added the wrong table.
- Set the CRS as WGS 84 (This will likely already be chosen)
- Save the file to your folder by choosing the '...'. I would recommend saving it as a .shp; however, it is possible to save it as a GPX here, but I have found that to be extremely unreliable and hasn't worked very well for me.
Merging files once in QGIS
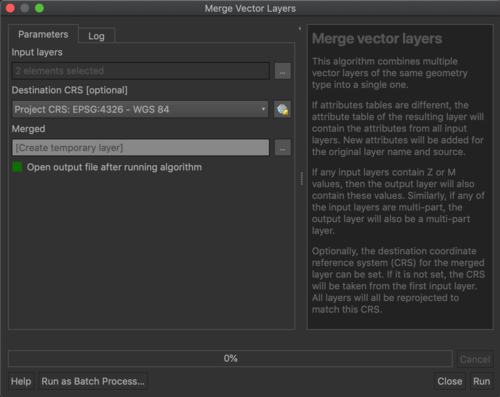
If you have a bunch of different layers representing your geocaches, I would recommend merging them into one file. This will make symbolizing them much easier and faster, and also make it so that transferring them back into GPX and onto the GPS is fast and efficient. This can be done easily using the 'Merge vector layers' tool from the toolbox.
- Like creating points from a table we did in the last step, search the toolbox for 'Merge vector layers'.
- Click the '...' and choose all the layers you wish to merge. These will be all the GPX layers that you loaded in previously.
- If when you press 'OK' the tool disappears, don't worry, it didn't crash, it was just moved to behind your QGIS window. This happens to me on a Mac so look around a bit, it's there somewhere.
- Set the CRS as WGS 84 and save it to your folder. Again, I would suggest saving it as a .shp.
You should now have a new layer that is all the geocache locations in one. If you would like, you could remove all the other layers, or simply turn them off by clicking the checkmark next to their name. This just relieves clutter.
Adding a basemap
All of your points will now be displayed in QGIS. You should now add a satellite basemap so that you can gauge the surroundings of the geocache locations.
- To do this, install the plugin 'QuickMapServices' (QMS), much like you did with the 'GPSTools' plugin; however, this plugin is not already installed, so you have to go through that process first. Don't worry, it only takes a couple of seconds.
- The tool will now be available in your toolbar along the top. You may need to play around with some of the options to get it to show, but it will appear as a globe:
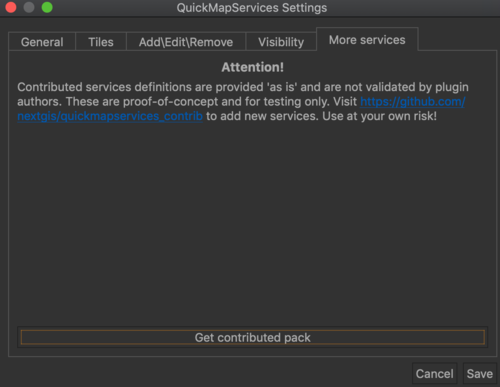
- I would suggest adding more basemaps to the tool by going to QMS settings > More services > Get contributed pack. This step is not necessary, but it adds a much wider selection of basemaps, including much of the ESRI and the Google library.
- You can now choose from any of the basemaps available through QMS, for this tutorial I would suggest the ESRI or Google satellite imagery. I have found that the ESRI imagery runs better.
- From the 'layers' panel on the left, ensure that the basemap is below your GPX files.
Finalizing the map
With all the points and the basemap added, you should have everything you need to create a helpful map. In this tutorial, I will show you how to make some quick and easy changes to your map, as well as a simple introduction into how to export the map so that you can print it.
Symbology
It may be difficult to see some of your geocaches, especially if they are present in a wooded area. Here, I will walk you through how to change the symbology so that they will pop a bit more.
- Right-click on the layer containing the geocache points. This will be in the left panel.
- Select 'Properties' at the bottom of the list.
- Once in the properties window, there will be a bunch of options and menus that you can sort through. For now, click on the 'Symbology' menu in the left panel.
- From here it is all about how you wish to set your symbology. There are a few things to note:
- Choose a colour that is in contrast to the surroundings. Red is often a good starter, but it is not always necessary as it can be a bit too harsh sometimes.
- You can alter the actual symbol itself, there is a decent library of symbols already in QGIS and you shouldn't have an issue with this map. If you are looking for other symbols, they can be loaded in as an SVG file. I won't go into more detail, but check out this site or this one if you are interested in learning more.
Labels
Labelling is always useful, it will help you determine what's what, and makes life easier when looking at a map.
- Like symbology, head to the properties menu, this time select 'Labels' from the left panel.
- There likely won't be anything in the menu except a single drop-down menu. Click the menu and select 'Single labels'.
- This will make it so that the labels apply to all points based on the same criteria. You can alter criteria depending on the 'rules' by choosing the 'Rule-based labelling' option.
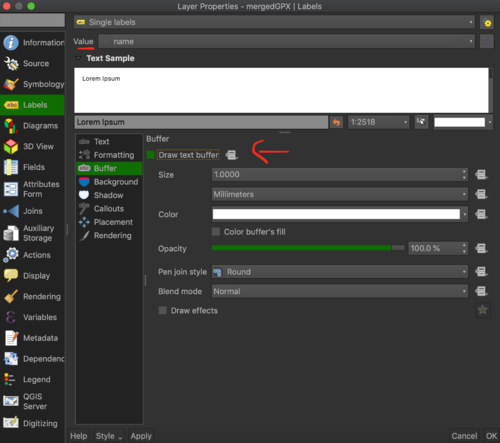
- All the fields will automatically fill, so if you don't want to you don't have to change anything, your points will be labelled. However, here are a few tips:
- Make sure the value is set to 'name', or whatever you want the label to say.
- You can increase the font size if you'd like, it usually starts small.
- I would recommend turning on a buffer. This will add white to behind the label, making it easier to read. I find this often corrects for having a small font size, so check to make sure it isn't too big and covering up too much of the map.
- You can change the placement if you'd like.
Print layout
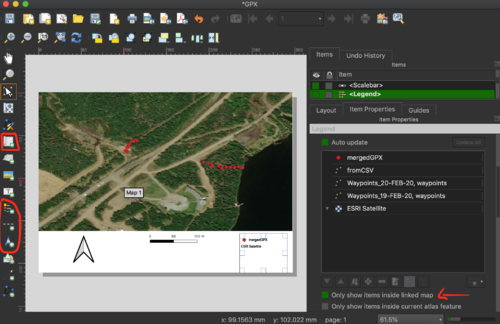
Now it's time for the most frustrating part of any map making, getting the map to look nice. If you'd like to skip the step of adding a legend, scale bar, and north arrow, you can just screenshot the part of the map that you want. At this point, the labels and symbology are what they will be on the final map, so this last step isn't necessarily needed. I will have a picture at the bottom of this section with the important tools highlighted, so don't worry if the steps are confusing.
- Along the toolbar, next to the save icon there is a tool that's called 'New Print Layout'. Choose this and give it a name.
- You will be welcomed by a completely new window. Note the tools along the left side of the window. These are how you will add the map frame, legend, scale bar, and north arrow.
- The first squared tool adds a map frame. You can add this however you'd like, it will automatically add the map that you created with your geocache locations.
- The legend, scale bar, and north arrow can now all be added. They will automatically be related to the map frame you added.
- You may add these wherever you'd like, but it's easiest if you leave some white space on the layout.
- If you're legend is full of layers that aren't being shown on the map, go to the legend properties.
- This can be done by right-clicking on the legend, or in the items panel on the right, choosing the legend and navigating to 'Item properties'.
- From the legend properties, scroll down and check 'Only show items inside of linked map'. This will remove all the excess layers.
Now that your map is completed, you may use the tools along the top toolbar to either print, export as image, or export as PDF.
Uploading points to GPS
By this point in the tutorial, you should have:
- A map with all your geocache locations (unless you skipped ahead)
- GPX file(s) with all you geocache locations
- If you skipped ahead, or used Google Earth instead of QGIS, you may have multiple GPX files.
From here, you now just have to get that file(s) onto your GPS unit.
If you used Google Earth, you should already have GPX files. Skip to section #Uploading to GPS.
If you do not have a unit that works with GPX, ensure that you have a GPX file then skip to section #Uploading to GPS.
First, plug your GPS into your computer.
NOTE: Make sure that you are using the correct connecting cord. My computer did not recognize my unit until I switched to a Garmin cord, I am not sure if this is a common issue (I would assume it isn't, I haven't been able to find much on it) or if the cords I was using before were damaged in some way.
Straight from QGIS
If you are already in QGIS with your one file containing all your geocache locations, this should be quite simple.
NOTE: QGIS only works with uploading GPX files, so your unit operates with a format other than GPX you may want to skip forward; however, if you have an SHP in with all your locations in QGIS, see the following step to convert it into a GPX, which can then be converted using GPSBabel.
If saved as SHP
If your file is saved as an SHP like I said you should do, there is a quick export that you must do first.
- Right-click on the layer with all your geocache points.
- Select 'Export' > 'Save Feature As...', and choose to save it as a GPX.
- Note that you will likely have to check the option 'GPX_USE_EXTENSIONS' to on.
If saved as GPX
If you saved the file as a GPX before, or just finished the previous step, we will be using the GPSTool to upload the GPX to the GPS. By the end of this section, you will have the points on your GPS.
- Load GPSTools.
- Go to the 'Upload to GPS' tab.
- Choose the GPX file that you created, and choose the correct device and port.
- Note that the only device that is pre-coded is the 'Garmin Serial', you can add new devices by choosing the edit devices and coding it in. Check out this website for help doing this.
Using GPSBabel
Converting to different formats
- Ensure that your 'input' and 'output' are checked as 'file'.
- Load your GPX file.
- Choose the format you'd like to translate to and save the file.
Uploading to GPS
- Ensure that you 'input' and 'output' are checked as 'file' and 'device' respectively.
- Load your file that you wish to be uploaded. This will be in GPX or another format that you just translated to.
- Choose the correct format (Garmin serial/USB protocol is likely to be good). If you need help with this, check the 'Help', it will take you to the documentation.
- Choose the correct output device (Your GPS).
References
Foster, D (2008). GPX for developers. Retrieved October 23, 2008, from The GPS exchange format Web site: http://www.topografix.com/gpx_for_developers.asp
MicroResources, (2008, July). Quantum GIS. Retrieved October 18, 2008, from QGIS.org Web site: http://qgis.org/index.php?option=com_content&task=blogsection&id=1&Itemid=99
