Difference between revisions of "User:Abenk"
From CUOSGwiki
Jump to navigationJump to search| Line 8: | Line 8: | ||
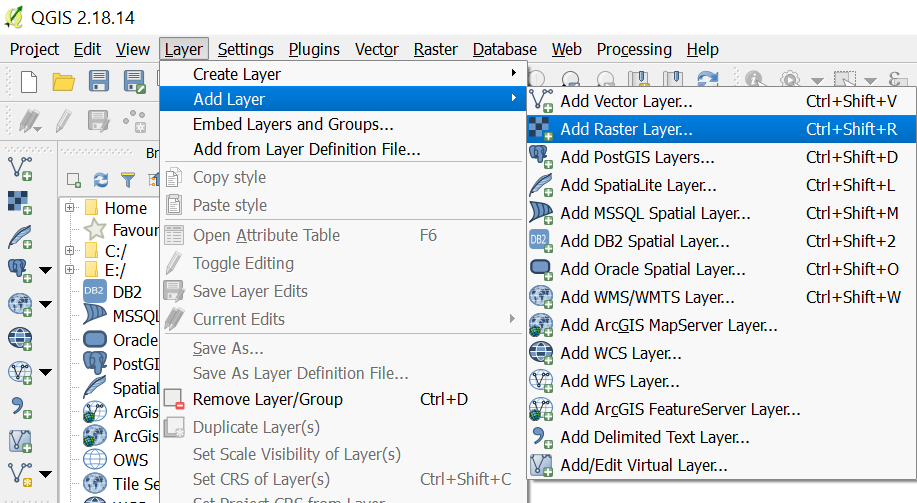
After extracting the data to your working directory, you can add the individual TIF files to QGIS by clicking '''Layer''' » '''Add Layer''' » '''Add Raster Layer''', or by pressing ctrl+shift+r. |
After extracting the data to your working directory, you can add the individual TIF files to QGIS by clicking '''Layer''' » '''Add Layer''' » '''Add Raster Layer''', or by pressing ctrl+shift+r. |
||
[[File:AddAbenk.png]] |
|||
Revision as of 17:01, 22 December 2017
Mosaicking and DEM Creation in QGIS
What is QGIS
QGIS is an open source software available from here that has a multitude of plugins to ensure that the user has the proper tools for their job. In this tutorial the desktop version for Windows will be used.
Data
The data that was used for this tutorial was taken from the USGS website and is derived from interferometric synthetic aperture radar (IFSAR) data. The data is projected in the NAD83 Alaska projection, and the original TIF images are 5 metre rasters found here.
After extracting the data to your working directory, you can add the individual TIF files to QGIS by clicking Layer » Add Layer » Add Raster Layer, or by pressing ctrl+shift+r.
