Difference between revisions of "Digitizing and Georeferencing in QGIS"
Nata Culhane (talk | contribs) |
Nata Culhane (talk | contribs) |
||
| Line 34: | Line 34: | ||
* In the QGIS Plugin Manager Dialog box search for Georeferencer GDAL. |
* In the QGIS Plugin Manager Dialog box search for Georeferencer GDAL. |
||
| − | * Ensure it is installed |
+ | * Ensure it is installed. Also make sure the checkbox is checked, this will make it appear in the toolbar. Click Close. |
| − | [[File:Picture2.png|frame|center]] |
||
| + | Next, open the Google Earth image to georeference: |
||
| ⚫ | |||
| ⚫ | |||
| − | [[File:Picture3.png|thumb|center]] |
||
| − | * Click the Add Raster Layer |
+ | * Click the Add Raster Layer icon. |
| − | * |
+ | * Browse to the location where we have the Google Earth image, select it and open it. |
| ⚫ | |||
| − | * Browse to the location where we have the TIFF Image and open the image |
||
| − | |||
| − | * Click on the image to select it the click Open. |
||
| − | |||
| ⚫ | |||
* On the Raster menu, click on the Georeferencer. |
* On the Raster menu, click on the Georeferencer. |
||
| Line 56: | Line 51: | ||
* Click the Open Raster tool and select the raster file. |
* Click the Open Raster tool and select the raster file. |
||
| − | [[File:Picture4.png|frame|center]] |
||
| − | |||
| − | Table showing the coordinates from google earth |
||
| + | Next, open the reference points file: |
||
| − | [[File:Screen Shot 2022-01-08 at 4.59.32 PM.png|frame|center]] |
||
| + | * To import reference points, select Layer > add vector layer > and open the reference points KML |
||
| ⚫ | |||
| + | Now, all data needed for the georeferencing process are open in QGIS. Start by tying points on the image to the reference point file: |
||
| − | * Click on the Add Points button |
||
| ⚫ | |||
| ⚫ | |||
| − | * |
+ | * Click on the Add Points button |
| ⚫ | |||
| − | [[File:Picture5.png|frame|center]] |
||
| + | |||
| − | |||
| + | * Select 'from map canvas'. This will allow you to click on your reference points instead of typing the coordinates in by hand. You can always edit them if they are off. |
||
| + | |||
| + | * Navigate to the correct point on your main map canvas, click it, and click OK. |
||
| + | |||
| + | [[File:Figure 4!!.jpg|frame|center|Entering map coordinates]] |
||
| ⚫ | |||
| + | |||
| + | [[File:Figure 5!!!.jpg|frame|center|Points all added to the Google Earth image]] |
||
| + | |||
| + | |||
| + | Now that all points are added, you can start georeferencing: |
||
| + | |||
| ⚫ | |||
| + | |||
| ⚫ | |||
| ⚫ | |||
| ⚫ | |||
| + | [[File:Figure 6!!.jpg|frame|center|Filling in transformation settings]] |
||
| ⚫ | |||
| ⚫ | |||
| + | If you would like to see that the georeference worked, you can preform a quick test: |
||
| ⚫ | |||
| + | * Add any default basemap to the main canvas, where your new file should have opened |
||
| − | [[File:Picture6.png|frame|center]] |
||
| − | |||
| + | * Turn on and off your image, and see if the points stay in the same place on the map (see Figure 7 below) |
||
| − | * At this point the raster should be now Geo-referenced. |
||
| − | [[File: |
+ | [[File:Figure 7.jpg|frame|center|Testing that georeferencing worked]] |
==Digitizing tool== |
==Digitizing tool== |
||
Revision as of 09:34, 20 September 2023
Contents
Introduction
This tutorial will demonstrate georeferencing and digitizing features in QGIS, using imagery downloaded from Google Earth Pro. Georeferencing is the process of taking a digital image, air-photo, or scanned topographic map, and using spatial data or coordinates to locate the image in the real world using GIS software (USGS, 2023). Essentially, georeferencing ties an image to the coordinate system used on earth, allowing for digital map analysis (point-and-click for coordinates, calculate area and distance, etc) (USGS, 2023). It links known reference points to the earth in order to georeference the entire image. Digitization is a process where geographic data in a hardcopy or a scanned image form is converted into vector data by tracing the features as either points, lines, or polygons, to convert georeferenced data to a digital format, such as a shapefile (ArcGIS Developers, 2023). Both digitizing and georeferencing are useful skills to learn, as they allow users to easily determine real-world spatial information from an image, such as knowing coordinates and distances. They are also always the first processes when analyzing a scanned or hardcopy map, so they are good basic skills to master.
The first section of this tutorial will focus on georeferencing, starting by downloading Google Earth imagery and reference points, then bringing these into QGIS and starting the georeferencing tool, tying reference points to the image, and finally producing the finished georeferenced file. The second section of the tutorial will use the georeferenced image from part 1 to explain basic digitizing skills, creating point, line, and polygon shapefiles from the image.
Software
Georeferencing can be done in a variety of GIS software. Here, QGIS is used. Quantum GIS (QGIS) is a free, open source (FOSS) GIS system that allows users to interact with geospatial data and analysis tools similarly to with more advanced programs. It supports various datasets such as vector, raster, several Plug-ins, and database formats and lets the user browse and create map data on their computer. This tutorial also uses Google Earth Pro, which is another free program that allows users to create point KML files, download images, and even do simple map analysis (calculate distance, etc).
Data
The first step is to locate a suitable historical image to georeference. These can be found in many places online, but in this tutorial it was obtained from Google Earth Pro. Regardless of where the data is obtained from, it is essential to also download or create reference/ control points to go along with the image. These points are what will be used later to actually georeference the image.
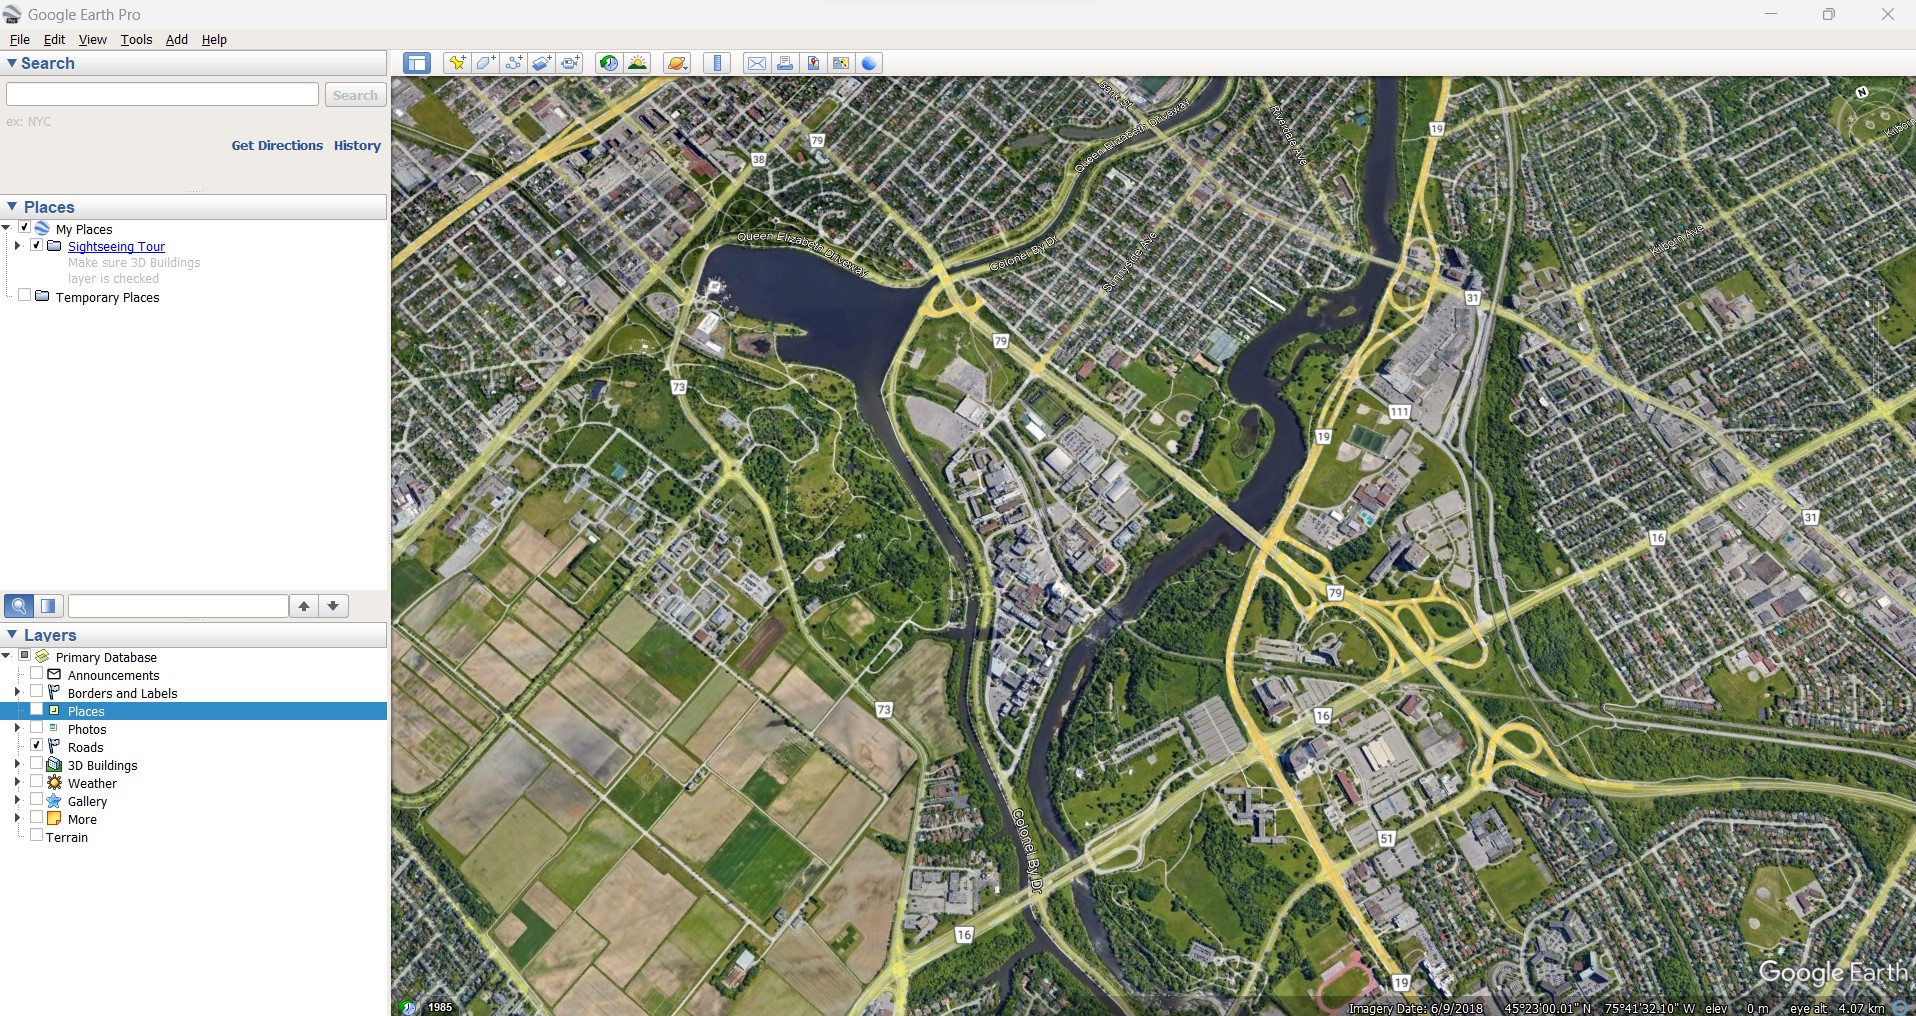
In this example, Carleton University was located on Google Earth Pro (see Figure 1 below).
Once you are happy with the location you've selected, go into the options panel > navigation > make sure that 'do not automatically tilt while zooming' is checked. As well, in the main menue, turn off terrain. This will ensure that your image is flat and easy to work with in QGIS.
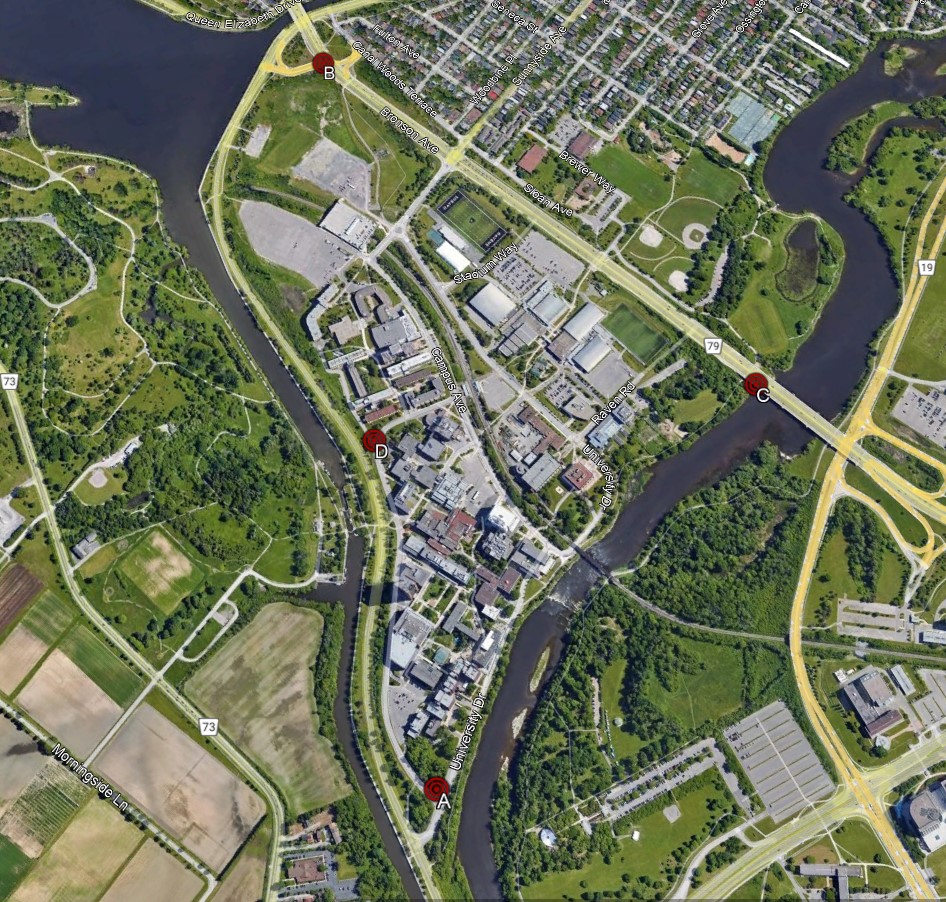
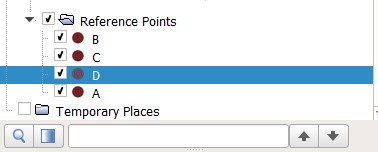
Next, create your reference points. The more points, the more accurate the georeferenced file will be, but a good basic number to start with is 4 - one in each corner of the image or area you are interested in. In the contents pane on the left of the screen, create a new folder, name it 'reference points', and move the four points into the folder. See Figure 2 and 3 below.
Finally, you are ready to export your image and reference points. To save the reference points, right click the folder> save place as > and ensure you are saving a KML file. To save the map, make sure all points are visible in your view, then go to file> save> save image. Turn off extra map options (like the title, etc), and choose the highest file size. Save as a JPEG.
Tutorial for Georeferencing with QGIS
With QGIS software open, the first step is to check whether the Georeferencer plugin is installed:
- Under the Plugins menu, Click on Manage and Install Plugins.
- In the QGIS Plugin Manager Dialog box search for Georeferencer GDAL.
- Ensure it is installed. Also make sure the checkbox is checked, this will make it appear in the toolbar. Click Close.
Next, open the Google Earth image to georeference:
- Click on the Raster tab and launch the Georeferencer.
- Click the Add Raster Layer icon.
- Browse to the location where we have the Google Earth image, select it and open it.
- In case the Coordinate Reference System Selector dialog opens, ensure the coordinate is set to the correct one for your location, then click OK.
- On the Raster menu, click on the Georeferencer.
- Click the Open Raster tool and select the raster file.
Next, open the reference points file:
- To import reference points, select Layer > add vector layer > and open the reference points KML
Now, all data needed for the georeferencing process are open in QGIS. Start by tying points on the image to the reference point file:
- Zoom in to point A of the image.
- Click on the Add Points button
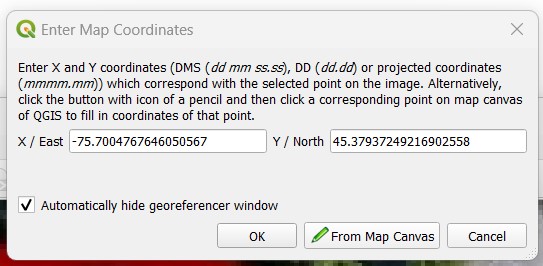
- On the raster, click on the corner point, the enter map coordinates dialog will appear
- Select 'from map canvas'. This will allow you to click on your reference points instead of typing the coordinates in by hand. You can always edit them if they are off.
- Navigate to the correct point on your main map canvas, click it, and click OK.
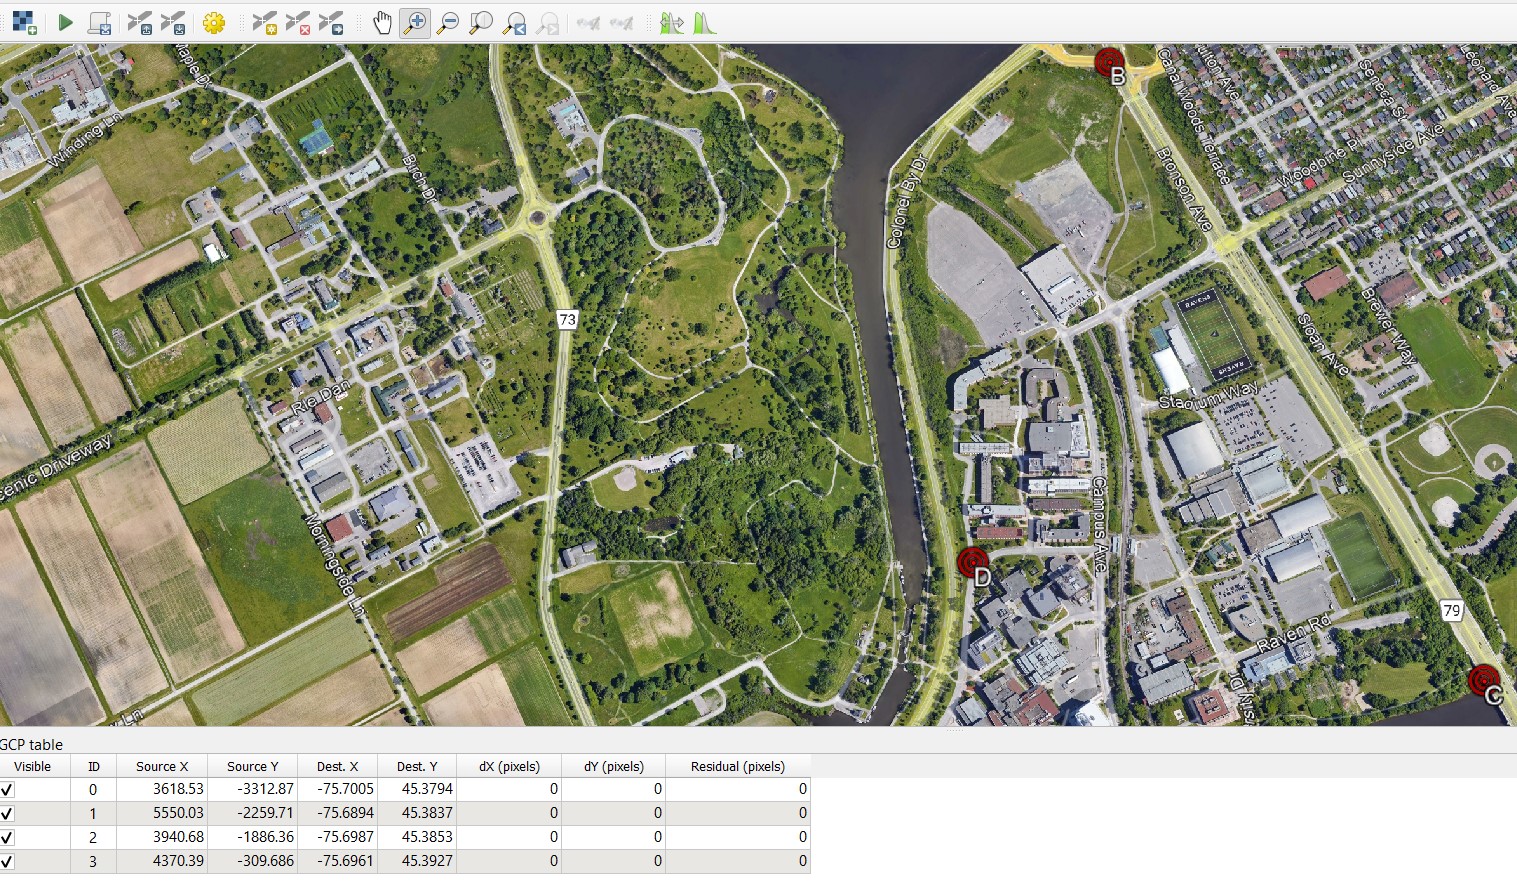
- Repeat for all the other three corners. You can also decide to save the GCPs, load GCPs, delete point or remove GCP point. See Figure 5 below.
Now that all points are added, you can start georeferencing:
- Click on the start georeferencing button to create the new georeferenced raster.
- Click OK on the info dialog when asked to set transformation type.
- Fill in the transformation settings dialog as shown in the figure that follows.
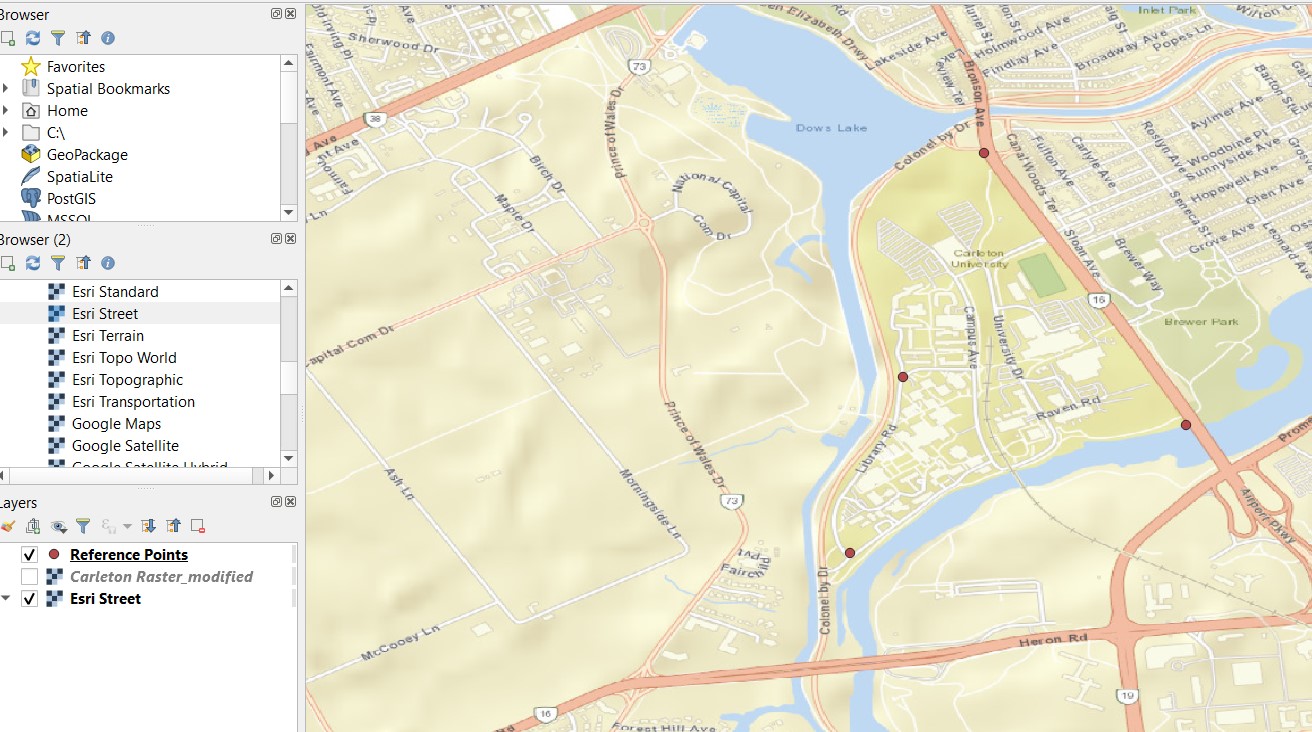
If you would like to see that the georeference worked, you can preform a quick test:
- Add any default basemap to the main canvas, where your new file should have opened
- Turn on and off your image, and see if the points stay in the same place on the map (see Figure 7 below)
Digitizing tool
Digitizing is one of the most frequent duties assigned to a GIS Specialist. Often, a significant portion of GIS effort is spent digitizing raster data in order to create vector layers for analysis. QGIS includes robust on-screen digitizing and editing features, which we shall investigate in this course.
Procedure
- Go to Layer ‣ Add Raster Layer. Locate the georeferenced image and click Open
- Set the default Digitizing Options. Go to Settings ‣ Options…
- Select the Digitizing tab in the Options dialog. Set the Default snap mode to To vertex and segment.
- Click OK.
- Click on Layer then create layer then new shapefile
- Once the layer is loaded, click the Toggle Editing button to put the layer in editing mode.
- Click the Add feature button. Click on the map canvas to add a new vertex. Add new vertices along the road feature. Once you have digitized a road segment, right-click to end the feature.
- Once you have finished digitizing all the roads, click the Toggle Editing button.
References
ArcGIS Developers. (2023). Geo-Referencing and Digitization of Scanned Maps. ArcGIS. https://developers.arcgis.com/python/guide/geo-referencing-and-digitization-of-scanned-maps/
USGS. (2023). What does ‘georeferenced’ mean?. USGS. https://www.usgs.gov/faqs/what-does-georeferenced-mean#:~:text=Georeferencing%20means%20that%20the%20internal,ground%20system%20of%20geographic%20coordinates
