Difference between revisions of "Supervised classification in QGIS"
(Created page with "Introduction") |
|||
| Line 1: | Line 1: | ||
==Purpose== |
|||
| ⚫ | |||
Every day thousands of satellite images are taken. To work with these images they need to be processed, e.g. they need to be classified. Since Remote Sensing software can be very expensive this tutorial should provide an open-source alternative: the Semi-automatic-classification plugin (SCP) in QGIS. You can already find a tutorial about the SCP here [https://gracilis.carleton.ca/CUOSGwiki/index.php/Remote_Sensing_Analysis_in_QGIS]. With this tutorial you can extend your ability to use the SCP while running through a supervised land-cover classification. |
|||
| ⚫ | |||
Land-cover classification classifies every pixel to a defined class using the spectral signatures. To define the classes region of interests (ROI) must be set. |
|||
==Installing the Software and SCP== |
|||
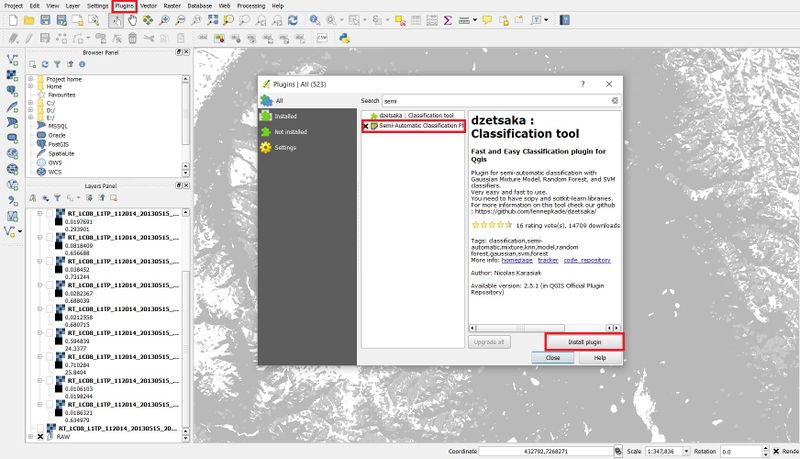
To start the latest version of QGIS which is QGIS 3.4.1. "Bonn" have to be downloaded here[https://qgis.org/en/site/forusers/download.html]. To go through remote Sensing procedure the Semi-automatic classification Plugin must be installed into QGIS. Navigate to the menu at the top to ''Plugin'' and select ''Manage and Install Plugins''. Following the picture the SCP can be found while typing "semi" in the search bar. Click ''install plugin'' and now you should be able to see the SCP Dock at the right or left of your user surface. |
|||
[[File:SCP.jpg|800px]] |
|||
==Data== |
|||
To download opensource satellite imagery, usually the USGS Earth Explorer website can be used and is found here [https://earthexplorer.usgs.gov/]. |
|||
Revision as of 13:43, 10 November 2018
Purpose
Every day thousands of satellite images are taken. To work with these images they need to be processed, e.g. they need to be classified. Since Remote Sensing software can be very expensive this tutorial should provide an open-source alternative: the Semi-automatic-classification plugin (SCP) in QGIS. You can already find a tutorial about the SCP here [1]. With this tutorial you can extend your ability to use the SCP while running through a supervised land-cover classification.
Introduction
Land-cover classification classifies every pixel to a defined class using the spectral signatures. To define the classes region of interests (ROI) must be set.
Installing the Software and SCP
To start the latest version of QGIS which is QGIS 3.4.1. "Bonn" have to be downloaded here[2]. To go through remote Sensing procedure the Semi-automatic classification Plugin must be installed into QGIS. Navigate to the menu at the top to Plugin and select Manage and Install Plugins. Following the picture the SCP can be found while typing "semi" in the search bar. Click install plugin and now you should be able to see the SCP Dock at the right or left of your user surface.
Data
To download opensource satellite imagery, usually the USGS Earth Explorer website can be used and is found here [3].
