Difference between revisions of "Traveling Salesman Problem (TSP)"
| Line 49: | Line 49: | ||
Next extract the customers that are within that ward from the larger customer data set. |
Next extract the customers that are within that ward from the larger customer data set. |
||
v.select ainput=Addresses@Try1 atype=point binput=Somerset@Try1 btype=area output=addSomerset |
v.select ainput=Addresses@Try1 atype=point binput=Somerset@Try1 btype=area output=addSomerset |
||
operator=within |
operator=within |
||
Next extract the Roadways |
Next extract the Roadways |
||
v.overlay ainput=Roadways@Try1 atype=line binput=Somerset@Try1 output=SomerRoads operator=and |
v.overlay ainput=Roadways@Try1 atype=line binput=Somerset@Try1 output=SomerRoads operator=and |
||
Revision as of 23:56, 18 December 2012
Introduction
About the Tutorial
If the command line is not working and you don’t wish to take the time to troubleshoot this problem I have been given a great work around from my teacher Scott Mitchell. If you do not have GRASS folders set up refer to step named Getting on our way.
- 1. Launch the OSGeo4W
- 2. Type grass64 –gui and then hit enter on the keyboard. (notice there is a space between 64 and the dash)
- 3. You will see the old GRASS version load, so simply click File from the menu bar and click Quit GIS Manager.
- 4. Now in the command box type g.gui gui=wxpython&
Installation
Firstly (30-60mins)
Firstly you will need to install free geospatial software. This can be found through the secure and trusted site of Open Source Geospatial Foundation OSGeo4w is Your Open Source Compass for Windows This package provides a set of open source geospatial software for a Win32 environment. Simply follow the directions from this site: Click Here to go to Download Page

Next (1-1.5 hrs)
Launching GRASS Tutorial This tutorial will give you a simple walk through of GRASS allowing for an increased understanding of the software, though it is not necessary to complete it in full.
The Tutorial
Getting on our way (just minutes)
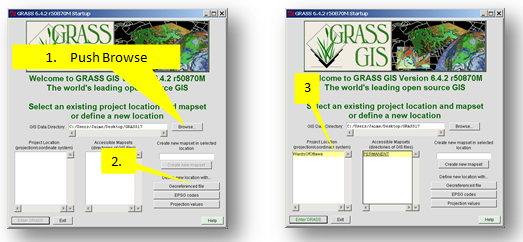
- 1. Prior to starting a GRASS session, create a New Folder named Grassdata and a second named nonGrassData. Start GRASS and once the screen opens, browse to the Grassdata folder. Ensure all file and folder names contain NO spaces, that they are short, and do not begin with numbers.
- 2. Push the button for Georeferenced files, name the newLocation Ottawa and then browse to the nonGrassData folder. Select the Roadways.shp file. Now click define.
- 3. Click on both Ottawa and then PERMANENT in each of the grey boxes and then push the ENTER GRASS button.

Now we are ready to start working in GRASS.
Import data files and prepare them for processing and analysis
1. You now have three screens open and running under GRASS. A command line black box, a GRASS GIS Layer Manager, and a Map Display pane. In the Layer Manager window click File | Import Vector Data |Common Import Formats.
- 2.

A GUI window will appear to lead you forward. Choose Roadways.shp from the drop down menu and push Run. If you watch the Layer Manager window it will tell you when all is complete. At the bottom of the window you will have to hit the Map Layers tab as you have been watching the command console tab.

3. Now the Roadways.shp file is loaded to the Layer Manager window simply toggle it on to view it in the Map Display window.
Next do the same for the Addresses.csv and wards.shp file. Also you must not accept all defaults as you did with Roadways. You must toggel on Override dataset projection. Remember to change the Format to CSV prior to browsing for the file.
Type this in the command line box, it will adjust the region parameters.
g.region -p vect=Roadways
Next extract the location you specifically wish to focus on. In this case it will be the Somerset ward.
v.extract input=Wards_2010 output=Somerset type=area where=cat=16
Next extract the customers that are within that ward from the larger customer data set.
v.select ainput=Addresses@Try1 atype=point binput=Somerset@Try1 btype=area output=addSomerset
operator=within
Next extract the Roadways
v.overlay ainput=Roadways@Try1 atype=line binput=Somerset@Try1 output=SomerRoads operator=and
Network Preperation
Next clean the data
v.clean input=HomesRoads output=networkIT type= line tool=break,rmdupl
We know that the homes are not located directly on top of the roads so we must calculate and attach them to the network for processing and analysis.
v.distance -p from=GloucesterADD to=networkIT upload=dist column=distance
Next connect the points to the network
v.net input=networkIT output=net points=GloucesterADD operation=connect thresh=166
we can view information about the network
v.category net op=report

Data
Go to The city of Ottawa, Open Data Site and download the .csv file Address Points (main) Or click this link. Note: When you unzip this file change its name to customers.csv. While at the same site download the Roadways.shp file and the wards2010.shp file too.
Conclusion
Contributions to This Tutorial
About This Tutorial
This tutorial was created for GEOM4008 which is part of the Geomatics program at Carleton University, located in Ottawa, Ontario, Canada.
External Links
Here is a list of links that offer additional support and information;
- Quantum GIS Web site
- Quantum GIS Wiki
- Grass GIS Web site
- Grass GIS Wiki
- Spatial Reference
References
Data