Difference between revisions of "Network Analysis: Finding shortest path in QGIS"
| Line 96: | Line 96: | ||
| + | |||
| + | |||
| + | Time Unit and Distance Unit we leave as default in hour and kilometer. Topology tolerance: In case if there is a gap between two lines to treat them as continuous, the topology tolerance may be applied, for example 10m. In our case we left as default 0. On the Transportation Layer, we choose the layer of the roads. In this case the clipped roads. For the direction field we leave as default. In other cases, while in the attribute table we might have a direction field, we might use the value of this field for direction. For this project we don't have any data for the direction. We keep the speed limit as default. And we choose the speed limit value under the Default Settings tab. For this example the speed was chosen 60 km/h as shown in Figure below. |
||
| + | |||
| + | |||
Revision as of 19:09, 16 December 2014
Contents
Introduction
Calculating the shortest distance between two points is a commonly cited use for GIS. QGIS ships with this tool, but it’s not visible by default. In this tutorial we will show you what you need to get started.
Data
Acquired QGIS (version 2.6)

Road Graph Plugin
- Activate the Tool
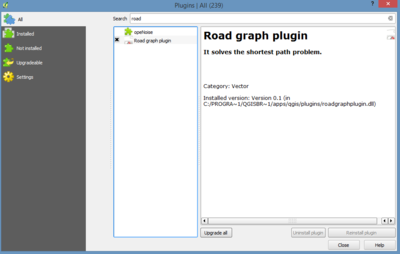
To activate the Road Graph plugin: Start the Plugin Manager by clicking on the QGIS main window’s menu item Plugins ‣ Manage Plugins. A dialog appears. Click OK on the Plugin Manager dialog.
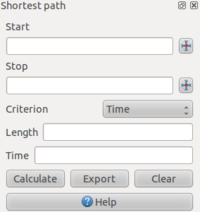
This panel will appear in your interface
If the plugin doesn't show automatically in your interface, go to View ‣ Panels and ensure that Shortest path has a check mark next to it.
- Configure the Tool
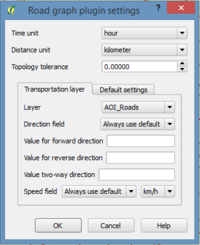
Time Unit and Distance Unit we leave as default in hour and kilometer. Topology tolerance: In case if there is a gap between two lines to treat them as continuous, the topology tolerance may be applied, for example 10m. In our case we left as default 0. On the Transportation Layer, we choose the layer of the roads. In this case the clipped roads. For the direction field we leave as default. In other cases, while in the attribute table we might have a direction field, we might use the value of this field for direction. For this project we don't have any data for the direction. We keep the speed limit as default. And we choose the speed limit value under the Default Settings tab. For this example the speed was chosen 60 km/h as shown in Figure below.
- Use the Tool
- Using Criteria


