Mapping The Carleton University Campus With “Grass GIS”
Contents
Introduction
Welcome to this tutorial on mapping the Carleton University campus with “GRASS GIS”, a powerful computational engine for raster, vector, and geospatial processing[1]. In this guide, we will explore how to leverage GRASS GIS to create a thematic map highlighting some features of the Carleton campus environment. Whether you’re a student, researcher, or simply interested in geographic analysis, this tutorial will provide step-by-step instructions to help you visualize a map. By the end, you’ll have the skills to create your maps and understand how you can manipulate layers to make descent maps on GRASS GIS. Let’s get started!
What Is GRASS GIS?
Geographic Resources Analysis Support System, commonly called GRASS GIS, is a geographic information system (GIS) software suite used for geospatial data management and analysis, image processing, producing graphics and maps, spatial modelling, and visualizing. GRASS GIS is licensed and released as free and open-source software under the GNU General Public License (GPL). It runs on multiple operating systems, including Linux, Mac and Windows. Users can interface with the software features through a graphical user interface (GUI) or by plugging into GRASS via other software such as QGIS[2].
Downloading GRASS GIS?
To get started with GRASS GIS, you can easily download and install it from the official GRASS GIS website. Navigate to https://grass.osgeo.org/ and select the “Download” section. Here, you’ll find installation packages for various operating systems, including Windows, macOS, and Linux. For Windows users, the OSGeo4W installer is recommended, while macOS users can download a pre-built package. Linux users can often find GRASS GIS in their distribution’s package manager. Follow the installation instructions provided for your operating system, and once installed, you can launch GRASS GIS to begin exploring its powerful features. Here, in this tutorial, the latest version “GRASS GIS 8.4” is used.
Downloading Data?
You can access the required data in two simple ways: The first is the MacOdrum Library (you may need a Carleton 360 account to access some layers). Go to https://library.carleton.ca/find/gis/base-layers and find the necessary data you need. The second is to obtain the layer package from OpenStreetMap Data Extracts (Geofabrik downloads). Go to https://download.geofabrik.de/ and choose your region to have the full package data of wherever you want (Be careful about data accuracy and precision in some cases!).
Download Data
Prior to the tutorial, the most recent GRASS GIS software (GRASS GIS 7.6) should be downloaded on the computer. GRASS GIS can be downloaded at the Grass GIS download page. Datasets were downloaded form the Carleton MacOdrum Library (https://library.carleton.ca/find/gis/base-layers).
Selection Grass GIS Database Directory and Location
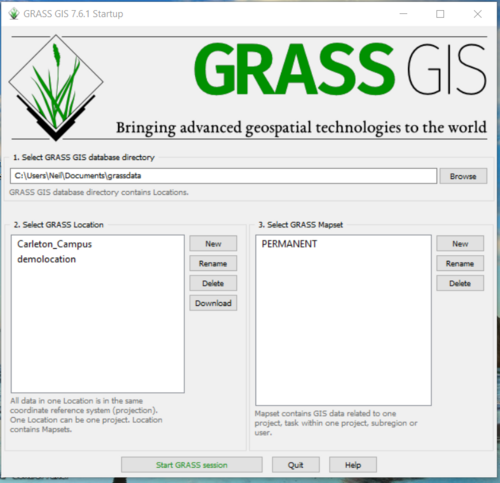
The first step, if you've never used GRASS before or no longer have other GRASS datasets is to set up a new folder that will be the directory storing all your GRASS databases. Tell GRASS that this is the location of your database. In that directory, other folders will be added for each study area, or "location" as GRASS terms them. Press the button on the startup screen that creates a new location. It is recommended that the name of the location folder be linked to the project. Select PERMAMENT as the default mapset. Press the "Start GRASS Session" to continue to the next step.
Figure 1: GRASS GIS start page – Selection of directory, location and mapset.
Projection Setting
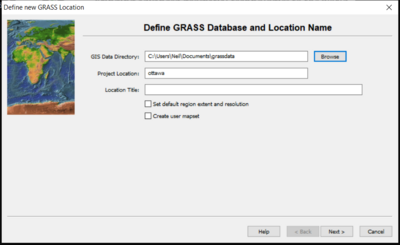
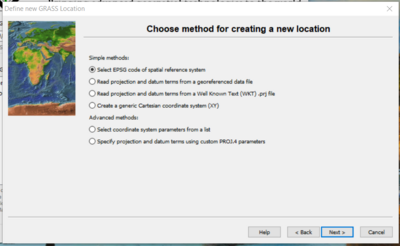
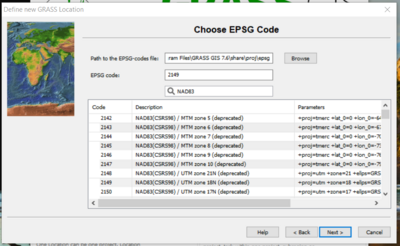
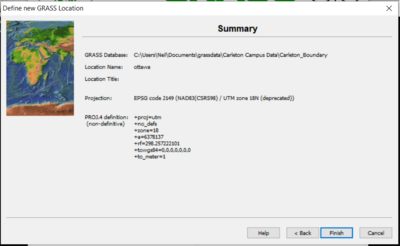
To display the data correctly, each data frame uses a coordinate system which should be first specified. Thus, it will determine the map projection for the map display in the data. Refer to Figure 1 and click on the “New” tab. Provide the project location which is Ottawa and click on Browser (Figure 2). Choose your folder and click on the next button. When Figure 3 pops out, select EPSG code of spatial reference system as the methods for creating a new location, and click next. Choose EPSG code 2149 and click next (Figure 4). The summary screen with the projection for the newly created location folder appears (Figure 5).
Figure 2: Define the Project Location Name
Figure 3: Methods for creating a new location
Figure 4: Choose EPSG Code
Figure 5: Projection for the newly created location folder
Adding Layers to Project
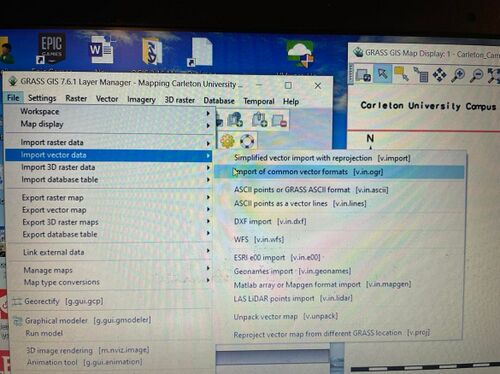
To add layers to the project, click first on the file tab and choose Import vector data. Then select Import of Common imports format (Figure 6).
Figure 6: Import vector data
The next step is to search for the layer’ shapefiles to be added to the project. Select the layer ’shapefile,
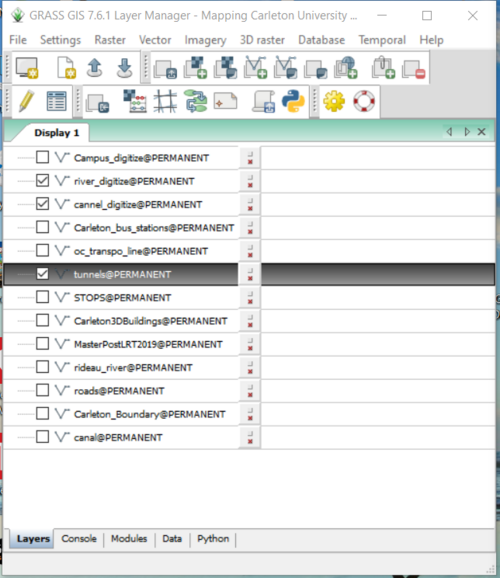
click on the run button. All selected layers will be listed as displayed on the Figure 7. You can now select
a layer to be added to the project.
Figure 7: Layers added to the project
Digitizing
Digitization is a process of converting raster data to vector layers. The following steps show how to proceed:
- On the layer management page (Figure 7), check the layer which raster data should be converted into vector layer.
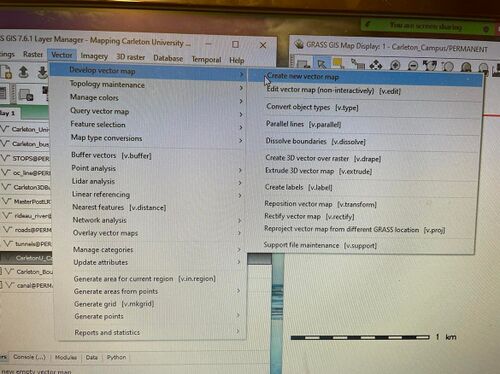
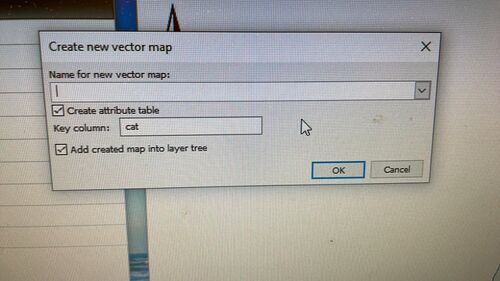
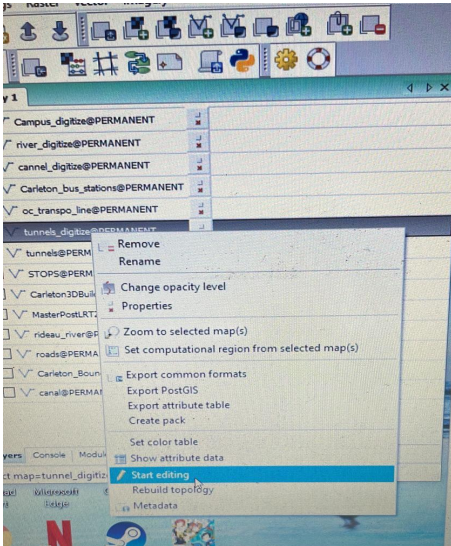
- Name the new created vector map and click on the OK button). Select the new created vector map, right click, and start editing (Figure 9).
- Depending on the shape, you can choose point, line, or polygon.
- Repeat these processes for all raster data. To leave the digitizing processes, click on the Quit button.
Figure 8a: Step to creating new vector map
Figure 8b: Creating new vector map
Figure 9: Selecting and editing a new created vector map
Creating the final Map
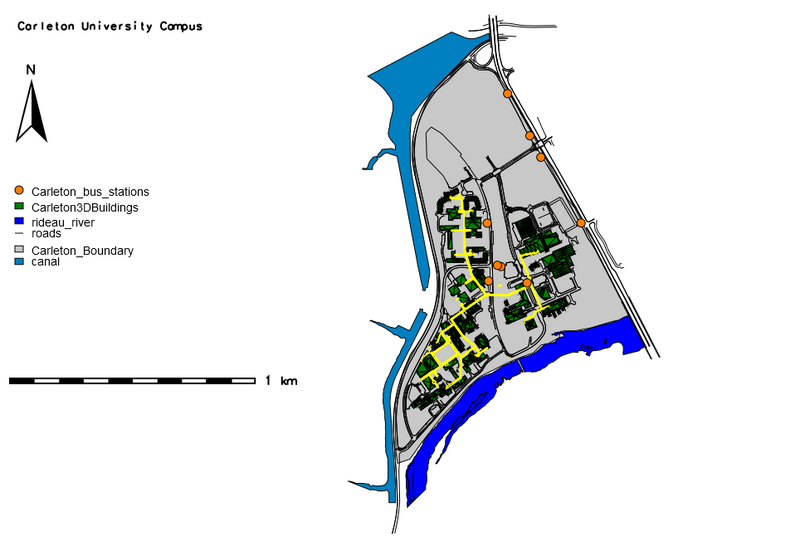
The final step is to add map features including the scale bar, the north arrow, the title of the map and the raster legend.
Figure 10: Carleton University Campus Map
Conclusion
GRASS GIS is an interesting software for creating maps. However, some software tools are sometimes very slow. This is what makes the software tend to crash. This experience shows that there is still development to be done to make the software more efficient. Hoping that this tutorial will guide in the use of some tools of the GRASS GIS software.
Resources
https://library.carleton.ca/find/gis/base-layers
