Spatial data management using PostGIS
Contents
Introduction
In a postindustrial society, data is undeniably perhaps the most important asset that an organization possesses to conduct operations on a daily basis. Data is the foundation of many outcomes for tasks conducted in organizations, that ultimately often revolve around decision-making. The gravity of data isn't only confined to large organizations conducting business, data is also an important asset for the scholar, the home business entrepreneur, research organizations, et cetera. In a postindustrial society which places an emphasis on gathering and analyzing data, there has been over the years a multitude of innovations specializing in the discipline of data management.
In this tutorial data management will be introduced for a specific data known as spatial data. Spatial data unlike regular data or other forms of data, has the intent of representing the geographic location of features & boundaries using coordinates and topology.{{[1]}}Further more, spatial data requires its own stream of technology for management, which distinguishes spatial data even more from other forms of data.
The intent of this tutorial will be to demonstrate the basic aspects of the discipline of data management specific to spatial data within a spatial database, and continue with demonstrating what can be achieved using a spatial database in terms of advance functionality. In addition to the primary intent, the entire tutorial will be conducted utilizing FOSS4G software and open source software, which FOSS4G is Free and Open Source Software for Geospatial. The benefit of giving a tutorial completely in open source software is that anyone could participate because the software is free of charge. Here is a list of open source software that will be utilized in this tutorial;
- Ubuntu
- PostgreSQL
- PostGIS
- Quantum GIS
- Open Jump
This tutorial's target audience is for individuals with little to no knowledge of database management software, but have some experience in Geomatics.
Data
In this tutorial, all the data was acquired from geobase.ca for the Ottawa region. For simplicity, it is suggested to download the identical or similar data from Geobase. It is necessary to have at least have a polyline and polygon vector ESRI shapefile.
About the Tutorial
The tutorial will be divided into four main modules, with one optional module. The modules are as follows;
- Installation of PostgreSQL & PostGIS
- Uploading Data
- Retrieving Data
- Advance Functionality & Data Processing
- PostGIS Raster Functionality (Optional)
During the entire tutorial, Linux commands will often be utilized for the execution of procedures, if it is not clear what the functionality of the command is, please refer to the external links sections for a link to a Linux command help page, or simply write man in the terminal followed by the command to get an instant help page.
Example of using man (manual):
man sudo
Installation
PostgreSQL
The first part of the installation for developing a spatial database, is the installation of PostgreSQL. This will be performed using what is known as the synaptic package manager, but via the terminal. (command line)
- In the Applications menu (top-left), in accessories click terminal. A terminal will open.
- In the terminal enter the following line;
sudo apt-get install postgresql postgresql-client postgresql-contrib pgadmin3
- This line will get and install packages for postgresql, the postgresql-client, postgresql-contrib, and pgadmin3. The postgresql package is the database itself, the postgresql-client is the client to communicate to the database from the shell(terminal), the postgresql-contrib is a library of additional tools for postgresql, and pgadmin3 is a gui interface that will easily allow user interaction with the database.
- Following the execution of that command, PostgreSQL will be installed on your computer.
- A quick test to ensure the database works, enter the following command in the terminal;
sudo su postgres
- you should see the following;
- The following procedure will be to create a user for the PostGreSQL database.
- Enter the following command within the terminal, in the PostgreSQL Client;[2]
createuser -sP [enter username]
- This command will create a new user, the -s & P before the name of the new user are parameters that will make the user a superuser and prompt the user for a password to ensure a password is set.
- Enter the following in the postgresql-client to exit the PostgreSQL Client, and properly logout.
Exit
PostGIS
PostGIS is a spatial database extender for the open source PostgreSQL database.[3] This extender is what will grant the capability to manage spatial data within the PostgreSQL database.
- Now its time to install the postGIS extension to PostgreSQL, which is performed using the following line in the terminal;
sudo apt-get install postgresql-8.4-postgis
There should be a similar output to what was seen when postgresql was installed.
- Now we will create a postgis spatial database template, which will be used as a model to create spatial databases. [4] The template is a quick method of creating a spatial database without having to go through the entire process each time, as seen in the creation of the spatial template.
- If you are not already in the postgres-client, enter the following
sudo su postgres
- The following command when execute will create a database using the UTF8 character encoding, and built modelled after the default PostgreSQL template that will be utilized as the spatial database template.
- The options are;
- -E specify the character encoding
- -T Use the postgresql template to build the database upon
createdb -E UTF8 -T template0 template_postgis
- The following command will define a new procedural language, which will basically add the plpgsql programming language to the template. [5]
- -d specifies the db name
createlang -d template_postgis plpgsql
- This line of code will add the SQL procedural language to template_postgis, which will enable the ability to write postgis functions/plpgsql scripts further on. It basically extends the capabilities of the spatial template.
- Now the postGIS SQL routines must be extended to the postgis template that we are creating.
- There are two files that must be added; postgis.sql and spatial_ref_sys.sql.
- The location for both files should be as follows (Note: Ensure the correct version of both postgresql and postgis is used in the file path);
- /usr/share/postgresql/8.4/contrib/postgis-1.5/postgis.sql
- /usr/share/postgresql/8.4/contrib/postgis-1.5/spatial_ref_sys.sql
- Execute the following two commands
psql -d template_postgis -f /usr/share/postgresql/8.4/contrib/postgis-1.5/postgis.sql
psql -d template_postgis -f /usr/share/postgresql/8.4/contrib/postgis-1.5/spatial_ref_sys.sql
- Now we want to allow users to alter the spatial tables. This procedure may not be necessary if the user is only setting-up a postgis DB at home, but it is useful in a professional environment with multiple users.
- Execute the following commands;
psql -d template_postgis -c "GRANT ALL ON geometry_columns TO PUBLIC;"
psql -d template_postgis -c "GRANT ALL ON geography_columns TO PUBLIC;"
psql -d template_postgis -c "GRANT ALL ON spatial_ref_sys TO PUBLIC;"
- Each command will modify the permissions for the geometry_columns, geography_columns, and the spatial_ref_sys table.
- The following command is a simple procedure that will basically clear all the storage sectors in the template to ensure there is no garbage. This basically ensures that the template is completely empty.
psql -d template_postgis -c "VACUUM FULL;"
- Now its time to test the spatially enabled database.
- Execute the following command;
psql -d template_postgis -c "SELECT postgis_full_version();"
- The following should appear on screen, press 'q' to return.
- NOTE: The version of PostGIS indicated in the screen capture probably varies from your screen. I've installed the unstable PostGIS 2.0 package.
- The following two commands should be executed to ensure that the previously created template is marked as a template.
psql -d postgres -c "UPDATE pg_database SET datistemplate='true' WHERE datname='template_postgis';"
- The datistemplate will specify that the db is to used as a template, and can be cloned by users with createdb privileges.
psql -d postgres -c "UPDATE pg_database SET datallowconn='false' WHERE datname='template_postgis';"
- The datallowconn if set to false, will refuse connections made directly to the database. This is a good technique to ensure your template doesn't get populate with unwanted data accidentally. (Notice that the PostGIS testing command above will not work if the datallowconn is set to false)
This Completes the Installation portion of the tutorial.
Uploading Data
Now that the PostgreSQL database has been installed and extended with the PostGIS extension. It is now possible to begin using PostGIS to manage data.
Create a Spatial Database
- The first procedure to storing data is to create a database to house the data. In this step we will create a database using the template created in the previous section.
- Execute the following command to create a spatial database using the spatial template;
createdb -T template_postgis ENV_CAN_DB
- ENV_CAN_DB, is the name of the database, enter whatever you would like as DB name.
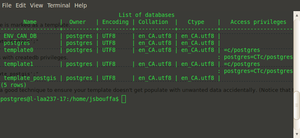
- To see the new database that you've created enter the following:
psql -l
- press the 'q' key once ready to return.
- You can also run the test query previously executed on the template_postgis to test the new database.
Managing Data
Before uploading data it would be viable to create a series of schemas to logical store your data.[6]
But first its time to open a GUI interface to communicate with PostgreSQL, which may facilitate further procedures, and help conceptualize the database, which up until this moment has only been encountered via command line.
During the initial installation of posgresql, another application was installed called pgadmin3. Pgadmin3 is an application that allows the user to perform database duties via a GUI interface.
- In the command line enter the following (ensure you typed exit to quit the postgresql client)
pgadmin3
- or
Go to Applications -> Programming -> Pgadmin3
A schema is a container which allows you to logically segment objects for an efficient management of data.1
- Now that the interface is open, you will need to create a connection to your postgresql server.
- Click on the electrical socket and you will get the following prompt.
- In the first field you will need to specify a name for the server, simply enter Postgresql or whatever you would like.
- In the host field, enter localhost.
- In the post field field you should have '5432' by default. If there are issues with this port number you can open /etc/postgresql/8.4/main/postgresql.conf using the following line
sudo gedit /etc/postgresql/8.4/main/postgresql.conf.
Once the file opens you will see a variable called port which will be assigned the default port number. That is the port number required to connect to the postgresql server.
- In the username field enter the name of the user you created.
- In the password field, enter the password for the username above.
- Press ok
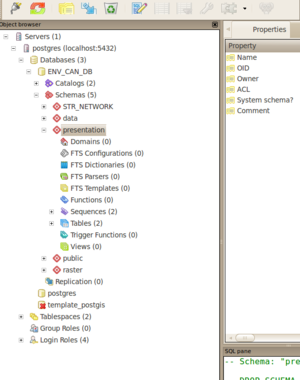
- Now you should have a postgres icon in the dropdown below server on the left-hand side. Click on this to expand the postgres server. Now click on databases, and select the database you created using the template_postgis.
- Before continuing towards uploading data to your spatial database, schemas will be created to logical store our data. It is important to create schemas and not store data in the public schema.
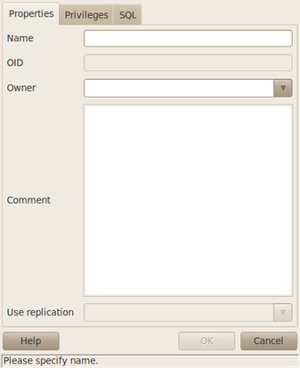
- In pgadmin3, right-click on schema and click on “new schema”. The following popup will appear.
- In the new schema form;
- Enter a name for the schema, which is representative of the data that will be stored in that schema.
- Indicate a owner if desired
- press ok.
- In the new schema form;
- The new schema is now created.
References
Schuurman, N., Bell, N. J., L'Heureux, R., & Hameed, S. M. (2009), "Modelling optimal location for pre-hospital helicopter emergency medical services" BMC Emergency Medicine, 9, 6. [1]
- ↑ Webopedia - http://www.webopedia.com/TERM/S/spatial_data.html
- ↑ PostgreSQL Documentation - http://www.postgresql.org/docs/8.4/static/app-createuser.htm
- ↑ Obe, Regina O. & Leo S. Hsu. 2010. PostGIS in Action. Manning Publishing.
- ↑ GeoLabs - http://geospatial.nomad-labs.com/2006/12/24/postgis-template-database/
- ↑ PostgreSQL 8.4 Documentation - http://www.postgresql.org/docs/8.4/static/app-createlang.html
- ↑ Obe, Regina O. & Leo S. Hsu. 2010. PostGIS in Action. Manning Publishing.


