Difference between revisions of "Automating SAGA Workflows Using Command Line Scripting"
Erinturnbull (talk | contribs) m (grammatical fix) |
Erinturnbull (talk | contribs) |
||
| Line 92: | Line 92: | ||
<code>F:\School\slope_from_points.bat F:\School\CarpDEM\CarpDEM.shp F:\School\CarpDEM</code> |
<code>F:\School\slope_from_points.bat F:\School\CarpDEM\CarpDEM.shp F:\School\CarpDEM</code> |
||
| − | More complex workflows, including error checking on the input variables and looping over multiple files are possible, but require advanced knowledge of scripting batch files in your environment and are beyond the scope of this tutorial. A good reference for those interested is the [https://en.wikibooks.org/wiki/Windows_Batch_Scripting WikiBook on Windows Batch Scripting]. |
+ | More complex workflows, including error checking on the input variables and looping over multiple files are possible, but require advanced knowledge of scripting batch files in your environment and are beyond the scope of this tutorial. A good reference for those interested is the [https://en.wikibooks.org/wiki/Windows_Batch_Scripting WikiBook on Windows Batch Scripting] or [https://tldp.org/LDP/abs/html/ Advanced Bash-Scripting] for those on Unix environments. |
== Methodology == |
== Methodology == |
||
Revision as of 10:35, 1 October 2020
Please note that this tutorial is not quite finished. Since there isn't a lot of material out there on this topic, it will hopefully prove useful to anyone researching this topic, and future contributions/edits are certainly welcome!
Contents
Introduction
Automating GIS tasks offers industry a means to efficiently repeat the same task. Doing so can reduce manual errors in processes as well as increase productivity. Many platforms offer this feature, but this tutorial will focus on the System for Automated Geoscientific Analyses (SAGA), created by the Department of Physical Geography at the University of Hamburg in Germany. It is one of the more popular free open-source software and offers both a command line option as well as Python integration for executing GIS tasks.
This tutorial is aimed at those who have some comfort using the command line interface to execute commands and some basic Python skills.
Objectives
1. Understand how to call SAGA tasks from the command line
2. Understand how to automate sequences of tasks using the command line and Python
3. Provide implementation differences between Windows and Unix environments
Getting Started
Installation
To install the software, please use the links below to install SAGA or Python as required.
![]()

Set PATH variable
To access the SAGA tools from a command line environment, you will use the saga_cmd tool (saga_cmd.exe on Windows). To make running this easier, you can add the path to the SAGA directory to your system path so that your operating system knows where to find saga_cmd. To do so, use the following commands depending on your operating system, replacing [SAGA_PATH] with the path to the directory where SAGA was installed. Otherwise, you'll have to enter the full path every time.
| Windows | Mac / Unix |
|---|---|
set PATH=%PATH%;[SAGA_PATH] |
export PATH=$PATH:[SAGA_PATH]
|
SAGA GIS Command Line Interface
SAGA GIS provides access to their tools via a command line interface which allows a user to set the parameters for and run a tool directly. By chaining these together in a script file, a user can build an analysis workflow which can be run repeatedly on-demand or scheduled using Task Scheduler or cron. This section discusses the basics of how to use this interface; for full documentation, refer to the SAGA tool documentation which has an example of how to call the tool from the command line at the bottom of the page.
Accessing the Help & Module List

There are several commands that can help get you started using the command line interface, which are listed below. The SAGA tool documentation is also a useful resource to get started with.
saga_cmd- When run with no parameters, this will display a list of available libraries.
saga_cmd --help- The
--helpflag will show you a summary of how to use the SAGA command line interface. saga_cmd --help LIBRARY_NAME- When you also specify a library after the
--helpflag, the interface will show you a list of tools in that module with numbers for each. saga_cmd --help LIBRARY_NAME TOOL_#- If you also specify a tool number, the help for that tool will be shown including the list of parameters.
Try out these commands to see if you can get the list of tools in the ta_morphometry and grid_spline libraries, and look at the parameters for the "Slope, Aspect, Curvature" and "Cubic Spline Approximation" tools. We'll use these in the next section.
Executing a Tool

To execute a tool, you have to give the command line interface the name of the library and the tool, followed by a set of parameters for the tool. These are documented both online and in the tool help.
For example, if we have a set of point data as a SHP file and want to create an interpolation of it using the Cubic Spline Approximation tool (which is tool #6), we can look at the parameters for this tool to see what we'd need to pass SAGA to execute the tool. These are the equivalent of what you'd need to fill in in the graphical interface to execute the tool. A select few are shown here, the full list can be obtained from the SAGA documentation if needed.
- SHAPES
- An input file of point data
- TARGET_TEMPLATE
- The output grid system
- TARGET_OUT_GRID
- The output file for gridded data (defaults to SAGA's
.sdatformat)
To call it on data located at [INPUT] and store the output as [OUTPUT], you would enter the following command. This will create [OUTPUT].sdat and store the interpolated grid at that location.
saga_cmd grid_spline 6 -SHAPES:"[INPUT]" -TARGET_OUT_GRID:"[OUTPUT]"
Chaining Tools Together
One advantage of the command line interface is you can execute multiple commands in sequence. This allows you to build a workflow of tools to be executed on an input dataset so that you get repeatable results without tedious error-prone manual work. There are several methods for doing this; here, the Windows batch script is described, but it is also possible to create a bash script on Unix environments that operates in the same fashion. Python can also be used to chain operations together
For example, let's say we have point data as our input. We want to run a cubic spline interpolation and then create a slope grid from the interpolated data, and we want the user to be able to specify the input point dataset as well as an output folder that will contain the interpolated DEM and the slope data. On Windows, we can reference parameters using %1, %2, etc. We can also specify a tilde between the percent sign and number (e.g. %~1) to remove any quotation marks the user might have added to handle paths with spaces in them. Assuming the first parameter will be the input file and the second the output directory, we can create a batch file like this:
saga_cmd grid_spline 6 -SHAPES:"%~1" -TARGET_OUT_GRID="%~2\GridDEM.sdat"
saga_cmd ta_morphometry 0 -ELEVATION:"%~2\GridDEM.sdat" -SLOPE:"%~2\Slope.sdat"
When the batch file is called with appropriate parameters, it will call both of the specified SAGA tools in order, using the output of the first command as an input for the second. In this way, we can chain together tools to execute a workflow using Windows batch files. An example command is below, assuming we called this slope_from_points.bat using CarpDEM.shp as an input and storing the output in the same directory.
F:\School\slope_from_points.bat F:\School\CarpDEM\CarpDEM.shp F:\School\CarpDEM
More complex workflows, including error checking on the input variables and looping over multiple files are possible, but require advanced knowledge of scripting batch files in your environment and are beyond the scope of this tutorial. A good reference for those interested is the WikiBook on Windows Batch Scripting or Advanced Bash-Scripting for those on Unix environments.
Methodology
SAGA_CMD
Exploring the environment of the command line application (saga_cmd)
The following are the basics for understanding the use of SAGA at the command line. Users can use the command line to quickly and efficiently run scripts to execute functions with specified parameters. This can be done either at a Windows command prompt, or a UNIX shell prompt. Although there are various UNIX shells available, probably the most popular one now, thanks to being the default shell for MacOS and most Linux distributions, is Bash. In the examples below, Bash syntax is used, and "[linux]" is used as a short form for any operating system that is running the bash shell.
To call on the library, a simple call can be used (“saga_cmd”). Simply calling on the command line automatically produces a list of the module libraries (see figure 2).
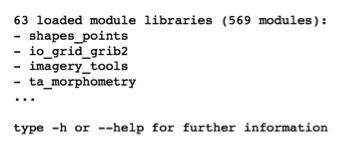

Figure 2. Command line results in SAGA for calling on the existing modules by using the command line.
To call on the library, which identifies functionality within a module, the user must input the name of the module after calling on “saga_cmd”. The result ends up with a list of the tools and functions of that specific library (see figure 3).

Figure 3. SAGA output results where calling on the command line and the associated library (this is using saga_cmd ta_lighting to call on the lighting module in SAGA).
For example, a workflow for hillshade analysis (calculating the angle between the surface and the incoming light beams in radians) can be used by automating the process of taking ASCII grids or DEMS, converting them into SAGA grids and then creating an analytical hillshade for each tile. The following command would be used to pull up all parameters in the hillshade analysis (see figure 4). Parameters must be defined and then can be run within the command line.
$ saga_cmd ta_lighting "Analytical Hillshading"
Reminder: (“ta_lighting” refers to the module it belongs to and “Analytical Hillshading” refers to the function name in the library of the module).
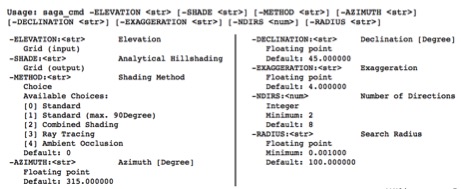

Figure 4. Variables to define in hillshade analysis.
Also, when left clicking “Analytical Hillshading” in the index, you can select “Create Script Command File” (see figure 5), where you can copy and paste command snippets to alter parameters (see figure 6).

Figure 5. Left clicking in index allows option to “Create Script Command File” to enable editing process of parameters included in module.
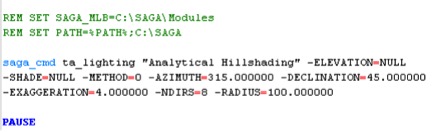

Figure 6. Script command created in process of figure 5.
When doing more basic tasks in SAGA, the command line is the most useful, as it requires the least amount of code associated with these processes. If the user is more interested in doing a more complicated analysis, or combine various tools and functions, this is where an outside program needs to be used. In this case, Python has been chosen to modify scripts and increase the functionality of SAGA.
Using Python
By using a similar workflow as the saga_cmd, the following can be used in Python to do the same tasks.
To call on module library:
mlb= saga_api.CSG_Module_Library
To choose a module from the library:
m= mlb.Get_Module(1)
- The number 1 refers to the ID number of the module (see figure 1 for that list in saga_cmd). You can also add in the name of the module, m= mlb.Get_Module(‘Analytical Hillshade”)
To get and set parameters:
P =m.Get_Parameters()
P(‘FILE’).Set_Value(fASC)
To run module:
print m.Get_Name() + ‘ : ’ = p( ‘FILE’ ) .asString()
(Sorry, to be continued...)
For More Information...
http://sourceforge.net/p/saga-gis/wiki/Creating%20Python%20scripts/