Digitizing in QGIS
Contents
Purpose
The purpose of this tutorial is to demonstrate the process of creating a vector model by digitizing an aerial photo within QGIS.
Objective
The objective is to retrieve an aerial photo of the City of Ottawa and using QGIS software digitize the different land use classes and geographical features within the photo.
Software
The software that will be used for this tutorial is QGIS 2.18.15. QGIS is a user friendly open source geographic information system, it runs on Linux, Unix, Mac OSX, Windows and Android and supports numerous vector, raster and database formats and functionalities. The software can be downloaded at [QGIS]
Data
The data for this tutorial is a aerial photo that was retrieved from [Carleton Library Aerial Images]. The specific aerial image that was used in this tutorial was from the 2014 Orthophotos-National Capital Commission (20cm) and the region that was chosen was over Carleton University.
Methods
This section outlines the steps that will be taken to digitize the image.
Before Beginning
Make sure to have QGIS downloaded and an aerial image saved to a location that it can be accessed.
Starting New Project
For this tutorial we will want to create a new project where all of the data will be stored
- Along the main toolbar locate the "Project" tab-->New
Adding Aerial Image
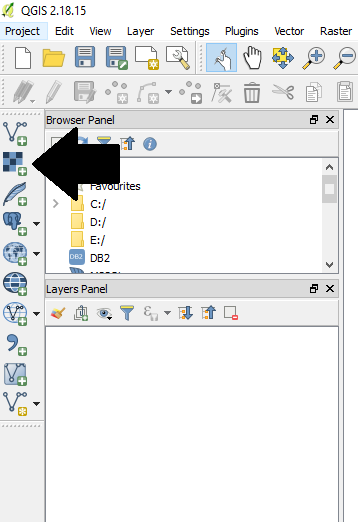
To add the aerial image that was chosen and saved,it can be added into the QGIS canvas by using the "Add raster layer" button.
- The "Add raster layer" button is located along the left panel

- locate the drive that you saved your aerial photo in and click "Open"
- Your aerial photo should now be open on the QGIS canvas, you can use the "Zoom in" tool
 and the "Zoom out" tool
 to help you identify geographical features or land uses within the aerial image.
Snapping Options
When digitizing there should be no gaps between vector layers, so setting up the snapping options will ensure that all lines and polygons are placed tightly together.
- along the main toolbar locate "Setting"-->Options
- the "Options" window will open and you will need to locate the "Digitizing" tab and click it
- within the "Digitizing" tab you will see subheadings-locate "Snapping"
- Within the "Snapping" subheading, you will set change the settings to the following:
- "Default snap mode" select "to vertex and segment"
- "Default snapping tolerance" set to "10.0 pixels"
- Search radius" to "10.0 pixels"
Setting the Projection
Before beginning to digitize the image, you need to make sure the correct projection is set for the image.
- to set the projection on the image within the "Layer Panel"