Using WMS with OpenLayers
Contents
Introduction
The goal of this project is to use freely available Web Map Service (WMS) layers with OpenLayers[1] to create a dynamic map for use within a web browser. This tutorial contains a brief outline of WMS layers and using the OpenLayers library. This includes creating a basic OpenLayers web app, adding WMS layers to the map, and working with projections in OpenLayers.
Required Data and Tools
WMS Layers
A WMS provides an HTTP interface for requesting geo-registered map images from one or more geospatial databases. A WMS request can define the geographic layer(s) and area of interest that will be processed by the service. The service then responds to the request with geo-registered map images (PNG images in this tutorial's example) which can then be displayed in a GIS tool or library like OpenLayers. Web Map Services[2] are an open standard defined by the Open Geospatial Consortium (OGC). All Web Map Services support a GetCapabilities request that returns an XML document that describes the capabilities of the WMS server. This includes the layers that the WMS serves, the supported styles, supported coordinate systems, etc.
Requests are made by adding parameters to the URL of a WMS. For example, to make the GetCapabilities request for the canvec_en service: https://maps.geogratis.gc.ca/wms/canvec_en?service=wms&version=1.3.0&request=GetCapabilities.
If the user has included more than one WMS layer, they have the ability to specify which will be the base layer, and which will be overlay layers. If the user then wants multiple images to be combined, the overlay layers need to be designated transparent. This is not necessary, however, as the user may want only one layer to appear at a time. This can be done by making the transparent flag false for each of the overlay layers, and then the user can manually switch between layers through the web browser. With OpenLayers the ‘LayerSwitcher’ control, which can be added into the code, is a popup that allows the user to do this by simply selecting which layer they want to view.
Several map services will be used in this tutorial.
| Name | URL | Layers | Description |
|---|---|---|---|
| elevation_en | https://maps.geogratis.gc.ca/wms/elevation_en?service=WMS&version=1.3.0 | cdsm.color-shaded-relief
|
Shaded relief map of Canada |
| CBMT | https://maps.geogratis.gc.ca/wms/CBMT?service=wms&version=1.3.0 | CBMT
|
Base map of Canada, highlighting transportation networks |
| railway_en | https://maps.geogratis.gc.ca/wms/railway_en?service=WMS&version=1.3.0 | railway
|
Canadian railway network |
| canvec_en | https://maps.geogratis.gc.ca/wms/canvec_en?service=wms&version=1.3.0 | land
|
Outline of land |
OpenLayers
OpenLayers is an open source JavaScript library that is used for building interactive mapping applications for use in web browsers. It is an Open Source Geospatial Foundation (OSGeo) project that supports many OGC standards including WMS, Web Feature Services (WFS), and Web Map Tile Services (WMTS). Documentation for OpenLayers can be found at https://openlayers.org[1].
Methods
Creating the OpenLayers Viewer
OpenLayers has a tool to create a basic viewer application, which is documented in their quickstart guide. The tool requires NodeJS to be installed, and some basic command line use. To create the OpenLayers project: create a new directory, and then run the project creation tool inside of the directory via the command line:
mkdir wms-tutorial && cd wms-tutorial

npx create-ol-app
This creates a number of files in the project directory including an HTML file, a JavaScript (.js) file, and a few other advanced configuration files. We will focus on the JavaScript file as this is where the OpenLayers code is located.
The main.js file created by the project creation tool contains the following code which creates a basic map with an OpenStreetMap layer. You can open this file for editing in any text editor (Visual Studio Code is a good one).
 1 import {Map, View} from 'ol';
 2 import TileLayer from 'ol/layer/Tile';
 3 import OSM from 'ol/source/OSM';
 4
 5 const map = new Map({
 6   target: 'map',
 7   layers: [
 8     new TileLayer({
 9       source: new OSM()
10     })
11   ],
12   view: new View({
13     center: [0, 0],
14     zoom: 2
15   })
16 });
To actually run the application, we again use the command line to start it by running the npm start command in the command line. Once started, the application can be accessed by navigating to http://localhost:1234 in your web browser. An interactive map should be visible. Now we can begin modifying it to add our WMS layers.
To add layers, we have to modify the default import statements to include image layer and WMS code from OpenLayers. We add an array of layers (lines 6–14) which will hold our layer and WMS request definitions, and then add the layers to our map (line 18). Here, we add a single WMS layer to start:
 1 import {Map, View} from 'ol';
 2 import {Image as ImageLayer, Tile as TileLayer} from 'ol/layer';
 3 import ImageWMS from 'ol/source/ImageWMS';
 4 import TileLayer from 'ol/layer/Tile';
 5
 6 const layers = [
 7   new ImageLayer({
 8     source: new ImageWMS({
 9       url: 'https://maps.geogratis.gc.ca/wms/elevation_en?service=WMS&version=1.3.0',
10       params: {layers: 'cdsm.color-shaded-relief'},
11       crossOrigin: 'Anonymous'
12     })
13   })
14 ];
15
16 const map = new Map({
17   target: 'map',
18   layers: layers,
19   view: new View({
20     center: [0, 0],
21     zoom: 2
22   })
23 });
There are several things to note about the layer definition shown on lines 7 through 13 in the code snippet above. We have to provide the URL for the WMS, along with the layer(s) that we want to be loaded in the params. The crossOrigin: 'Anonymous' parameter is required for some WMS servers due to browser security rules that restrict how web apps can load data from other websites.
Multiple image layers can be added by adding their definition to the layers array. The order in which they are placed in the array determines the order in which they are displayed in the viewer, with the first entry being the bottomost layer. We can see this by adding more layers, including a layer that contains transparent images allowing us to see the layer beneath it.
 6 const layers = [
 7   new ImageLayer({
 8     source: new ImageWMS({
 9       url: 'https://maps.geogratis.gc.ca/wms/elevation_en?service=WMS&version=1.3.0',
10       params: {layers: 'cdsm.color-shaded-relief'},
11       crossOrigin: "Anonymous"
12     })
13   }),
14   new ImageLayer({
15     source: new ImageWMS({
16       url: 'https://maps.geogratis.gc.ca/wms/CBMT?service=wms&version=1.3.0',
17       params: {layers: 'CBMT'},
18       crossOrigin: 'Anonymous'
19     })
20   }),
21   new ImageLayer({
22     source: new ImageWMS({
23       url: 'https://maps.geogratis.gc.ca/wms/railway_en?service=WMS&version=1.3.0',
24       params: {layers: 'railway'},
25       crossOrigin: "Anonymous"
26     })
27   }),
28   new ImageLayer({
29     source: new ImageWMS({
30       url: 'https://maps.geogratis.gc.ca/wms/canvec_en?service=wms&version=1.3.0',
31       params: {layers: 'land'},
32       crossOrigin: "Anonymous"
33     })
34   }),
35 ];
Projections
The default projection used by OpenLayers is the EPGS:3857 (WGS84 Pseudo-Mercator) projection. For the majority of use-cases this is sufficient, but OpenLayers supports many other predefined projections, as well as any arbitrary projection definition. The projection of the map view can be changed by adding a projection parameter to the View initializer. For example, to change the projection to EPSG:4326 (unprojected WGS84):
37 const map = new Map({
38   target: 'map',
39   layers: layers,
40   view: new View({
41     center: [0, 0],
42     zoom: 15,
43     projection: 'EPSG:4326'
44   })
45 });
OpenLayers only has a limited set of projections built in however. For example, if we tried to use the EPSG:42304 (NAD83 Lambert Conformal Conic) projection the map viewer would not load because OpenLayers does not recognize it.
To define a new projection, we can use the open source proj4js library which can be installed in our project by running npm install proj4 from the command line inside the project directory. Once installed, we can import proj4js into our code and use it to define the projection. The definition of an EPSG projection [3] can be looked up at https://epsg.io (there is even a tab specifically for proj4js). The line of proj4js definition code can be added anywhere in our code, as long as it is before the initialization of the map. We also need to register proj4js with OpenLayers so that it is aware of the projection definition. Once registered, we can use the projection that we defined in any OpenLayers function.
 1 import {Map, View} from 'ol';
 2 import {Image as ImageLayer, Tile as TileLayer} from 'ol/layer';
 3 import ImageWMS from 'ol/source/ImageWMS';
 4 import TileLayer from 'ol/layer/Tile';
 5 import proj4 from 'proj4';
 6 import {register} from 'ol/proj/proj4';
 7
 8 proj4.defs("EPSG:42304","+proj=lcc +lat_1=49 +lat_2=77 +lat_0=49 +lon_0=-95 +x_0=0 +y_0=0 +datum=NAD83 +units=m +no_defs");
 9 register(proj4);
10
11 const layers = [
12   new ImageLayer({
13     source: new ImageWMS({
14       url: 'https://maps.geogratis.gc.ca/wms/elevation_en?service=WMS&version=1.3.0',
15       params: {layers: 'cdsm.color-shaded-relief'},
16       crossOrigin: "Anonymous"
17     })
18   }),
19   new ImageLayer({
20     source: new ImageWMS({
21       url: 'https://maps.geogratis.gc.ca/wms/CBMT?service=wms&version=1.3.0',
22       params: {layers: 'CBMT'},
23       crossOrigin: 'Anonymous'
24     })
25   }),
26   new ImageLayer({
27     source: new ImageWMS({
28       url: 'https://maps.geogratis.gc.ca/wms/railway_en?service=WMS&version=1.3.0',
29       params: {layers: 'railway'},
30       crossOrigin: "Anonymous"
31     })
32   }),
33   new ImageLayer({
34     source: new ImageWMS({
35       url: 'https://maps.geogratis.gc.ca/wms/canvec_en?service=wms&version=1.3.0',
36       params: {layers: 'land'},
37       crossOrigin: "Anonymous"
38     })
39   }),
40 ];
41
42 const map = new Map({
43   target: 'map',
44   layers,
45   view: new View({
46     center: [0, 0],
47     zoom: 2,
48     projection: 'EPSG:42304'
49   })
50 });
It is important to note that changing the projection of the OpenLayers view will also change the coordinate system used by OpenLayers. For instance, if we wanted to center the map on the Carleton campus, which is located at -75.696254, 45.384792 (longitude, latitude), this will not work because the EPSG:42304 projection's coordinate systems is in meters, not longitude/latitude degrees. OpenLayers has built in functionality that allows us to transform coordinates between coordinate systems, and to convert from latitude and longitude we can import the convenience function fromLonLat:
1 import {Map, View} from 'ol';
2 import {Image as ImageLayer, Tile as TileLayer} from 'ol/layer';
3 import ImageWMS from 'ol/source/ImageWMS';
4 import TileLayer from 'ol/layer/Tile';
5 import proj4 from 'proj4';
6 import {register} from 'ol/proj/proj4';
7 import {fromLonLat} from 'ol/proj';
Next, we can update the View initializer to use the transformed longitude and latitude coordinates. The target projection must be specified (if not, the default is EPSG:3857).
43 const map = new Map({
44   target: 'map',
45   layers,
46   view: new View({
47     center: fromLonLat([-75.696254, 45.384792], 'EPSG:42304'),
48     zoom: 15,
49     projection: 'EPSG:42304'
50   })
51 });
Resulting Map
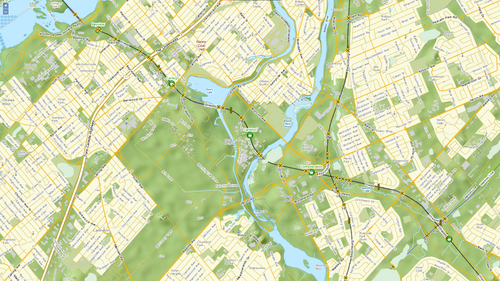
Figure 1. The OpenLayers WMS viewer built in this tutorial
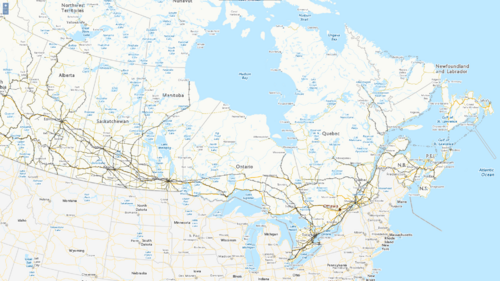
Figure 2. The OpenLayers WMS viewer at a smaller scale, showing the EPSG:42304 projection
Source Code
The final version of the JavaScript code can be found below.
 1 import {Map, View} from 'ol';
 2 import {Image as ImageLayer, Tile as TileLayer} from 'ol/layer';
 3 import ImageWMS from 'ol/source/ImageWMS';
 4 import TileLayer from 'ol/layer/Tile';
 5 import proj4 from 'proj4';
 6 import {register} from 'ol/proj/proj4';
 7 import {fromLonLat} from 'ol/proj';
 8
 9 proj4.defs("EPSG:42304","+proj=lcc +lat_1=49 +lat_2=77 +lat_0=49 +lon_0=-95 +x_0=0 +y_0=0 +datum=NAD83 +units=m +no_defs");
10 register(proj4);
11
12 const layers = [
13   new ImageLayer({
14     source: new ImageWMS({
15       url: 'https://maps.geogratis.gc.ca/wms/elevation_en?service=WMS&version=1.3.0',
16       params: {layers: 'cdsm.color-shaded-relief'},
17       crossOrigin: "Anonymous"
18     })
19   }),
20   new ImageLayer({
21     source: new ImageWMS({
22       url: 'https://maps.geogratis.gc.ca/wms/CBMT?service=wms&version=1.3.0',
23       params: {layers: 'CBMT'},
24       crossOrigin: 'Anonymous'
25     })
26   }),
27   new ImageLayer({
28     source: new ImageWMS({
29       url: 'https://maps.geogratis.gc.ca/wms/railway_en?service=WMS&version=1.3.0',
30       params: {layers: 'railway'},
31       crossOrigin: "Anonymous"
32     })
33   }),
34   new ImageLayer({
35     source: new ImageWMS({
36       url: 'https://maps.geogratis.gc.ca/wms/canvec_en?service=wms&version=1.3.0',
37       params: {layers: 'land'},
38       crossOrigin: "Anonymous"
39     })
40   }),
41 ];
42
43 const map = new Map({
44   target: 'map',
45   layers,
46   view: new View({
47     center: fromLonLat([-75.696254, 45.384792], 'EPSG:42304'),
48     zoom: 15,
49     projection: 'EPSG:42304'
50   })
51 });
References
- ↑ 1.0 1.1 OpenLayers https://openlayers.org
- ↑ Open Geospatial Consortium WMS Standard https://www.ogc.org/standards/wms/
- ↑ EPSG refers to European Petroleum Survey Group, which is now-defunct, but has been absorbed into the International Association of Oil and Gas Producers (OGP) Geomatics Committee. They are an authority for maintaining map projection codes in order for there to be a standard directory of projections.

