Creating DSMs DTMs and Orthomosaics in WebODM From Drone Images
Contents
Purpose
The purpose of this tutorial is to teach the user how to use WebODM, in order to create surface models and orthomosaics from a provided data set of photos taken with a consumer drone.
Introduction
What is WebODM, and why would you use it?
WebODM (standing for Open Drone Map) is an open-source software package with a graphical user interface that allows users to process remotely sensed data from drones into various types of outputs. WebODM allows the user to process RGB colour images, or multispectral images into outputs including: DSMs, DTMs, pointclouds, orthomosaics, and other formats. The software allows for the use of ground control points, and rolling shutter correction. For more information, visit the WebODM website here: https://www.opendronemap.org/webodm/. In this tutorial we will be learning how to install and use this software with a sample set of RGB drone images to create a DSM, DTM and orthomosaic. We will also have the software output an accuracy report.
Step 1: Installtion
Before we begin the installation process, please note that this tutorial assumes the user is using a modern computer, with a discrete GPU. The tutorial was created and tested running on a windows professional system, thus the process may not work fully for Linux and Mac OS users.
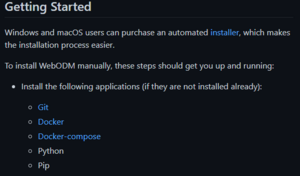
To begin the install, go to the link here: https://github.com/OpenDroneMap/WebODM/ and scroll down to the “Getting Started” section as seen in figure 1. This tutorial assumes that the user already has python installed. Neither Docker-Compose, nor Pip are necessary for our purposes.
1a: Git
To begin the Git installation process, click on the blue hyperlinked Git text shown in figure 1. Select your operating system and download the “standalone installer” not the “portable” version. Open the file download location and run the Git installer. There will be several options and pages during the install of Git, leave all the options in their default state, and click next through the menus without modifying any options until the program begins installing, this will take a minute once it begins. Once you get to the final page after install, click finish. Git is now installed on your machine.
1b: Docker 2.2.0.5
Before beginning the installation of Docker, ensure that virtualization is enabled on your machine if it is not already. This can be done in your computer’s BIOS settings, and the process to enable it varies depending on your hardware. Docker is essentially a virtual machine that we will use to run WebODM, and we will then access it through a web browser window. To begin the installation of Docker, click here: https://docs.docker.com/desktop/previous-versions/2.x-windows/ . Scroll down to reach the download link for Docker version 2.2.0.5. We will be using this version as it allows us to more easily control the resources we allocate to Docker in terms of memory, CPU threads, and storage. Once you have downloaded this version of Docker, open the installer and proceed through the installation, leaving all the settings default once again. Once this process is finished, run docker if it is not already running (note: it can take a while to start up, and this can be monitored in your windows “hidden icons” tab at the bottom right hand corner of the windows dashboard. Once you have Docker open, you will notice that it says “No containers running” this is where WebODM will show up once we complete the next step of the tutorial.
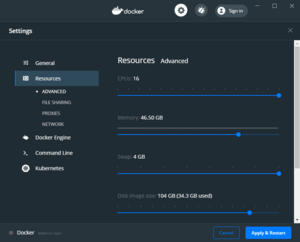
To chose your resource allocation for Docker, click the cog wheel in the upper bar of the window, and on the left hand side, navigate to the resources tab. In this tab, you will want to allocate as much memory and CPU threads as you can, as well as maxing out the “Swap” slider. For disk image size, this is up to you, depending on how many projects you intend to keep in your WebODM image. For this tutorial, allocate at least 30GB to be safe. Please note that the more CPU threads and memory you allocate to Docker, the less your main system will have access to while WebODM is running. Click to apply your settings, and Docker will restart (again this make take some time). If you’ve allocated too much memory, Docker will not start, if this happens, navigate back to the resources menu to lower the memory allocation and try again.

